

Commodore’s Garage #14 – Ride Heights, Perches, and Deflections
December 2nd, 2016 by Matt Holden
The last major piece of the puzzle we need to look at before diving into building a setup are the three simplest things in the garage: ride heights. Older (and even some newer racing games) have a “Ride Height” adjustment in their setup garages, completely independent of the rest of the car. Anyone who’s ever worked on a car at all knows that simply breathing on part of the car in the wrong way can move the ride heights around, and iRacing included that extra bit of realism (some call it a “frustration”!) to their garage system. Where ride heights have been a set-and-forget setting in the past, completely ignoring them can run you into some major issues that may seem un-solvable. In addition, ride heights (and the requirements for those ride heights) are where every setup begins, so now that you [hopefully] know the rest, let’s look at the final variable!
Ride Heights
Ride heights are simply a measurement of how far a car is from the ground. In many cases, this is not the lowest point on the car, and while the ride heights may read as 3 inches (or 7.6cm…), there could be part of the car that is much lower, such as suspension components or body panels. In addition, most teams have their own way of measuring the car’s ride height, and it can vary from car to car. For road racing, ride heights can be measured in multiple places across multiple teams, even if they run the same car. It’s important to learn where these ride height points are measured so you know what you’re dealing with at each track. For oval racing, it’s a bit simpler, since most oval cars measure their ride heights at the frame rails at the bottom of the “door” panels. Below is a picture of the NASCAR Xfinity Camaro with the approximate front and rear ride height points highlighted. Keep in mind that the ride height is measured at the frame, not the skirt, in the garage!

Arrows mark the typical locations for ride height measurements on a stock car. Note that the arrows do not point to the skirt, but the approximate location of the frame rail. Also, note that parts of the car, like the splitter, are lower than the measured ride heights!
Ride heights can be determined in multiple ways, primarily dictated by the series rules. Almost every racing series has a minimum ride height rule in place, so setting the car at those minimums is often the way to go. Beyond the rules, track characteristics play into the necessary ride heights as well. If the track is bumpy, like Kentucky or Lime Rock, or has a lot of vertical loading changes, such as Zandvoort, higher ride heights may be necessary to keep the car from contacting the racing surface. On smoother tracks like Kansas or COTA, lower ride heights and a more aggressive aerodynamic attitude is possible. Setting the car too low can be an aerodynamic advantage, but on a rough track can cause an excessive loss of mechanical grip, and a loss in speed.
In some cases, minimum ride heights at all four corners is not the optimum situation for a given car. Testing will help you find what you like best, but some cars perform better with extra rake set in the car, or higher rear ride heights. This can provide an aerodynamic benefit, resulting in more front downforce and increased oversteer, while other cars may behave better with a flatter set of ride heights. For oval racing, it’s common to only have one corner set at the minimum ride height, typically the left-front corner, with the highest usually being the right-rear.
Your starting ride heights will often dictate the spring package you choose in your car. In every situation with every car on every track, we’d like the car to settle down and drop below the minimum required heights and “seal” off the bottom of the car, producing maximum downforce. Where we start the car in the garage tells us what we need to do to achieve the lower ride heights on track. If we have to start the car up higher for either track characteristics or rules, we’ll need a softer set of springs to allow it to drop under aerodynamic loads. Conversely, if we start the car lower, we’ll need stiffer springs to keep the car off the track surface.
Coil-binding and bump stops can go against those general rules, however, since we can start the car with a softer riding spring rate and wind up on a much stiffer rate after compression. This is most often used to circumvent and essentially ignore ride height rules by installing springs that will keep the car at legal ride heights when stopped, but utilize a stiffer spring package for better aerodynamics while on track. How you choose to set up your car is up to you, and I suggest trying multiple packages to see what fits your driving style best. When we start looking at putting together a spring package for a track in the coming weeks, we’ll consider all of these options and go into each in more detail.
Spring Perch Offset/Shock Collar Offset
The way to adjust ride heights on a stock car in both real life and iRacing is through spring mount offsets. On a “big spring” car such as the NASCAR Truck, Xfinity, Cup, and National cars, this is the Spring Perch Offset adjustment. On a coil-over car like the Late Models, Modifieds, and Legend cars, this is the Shock Collar Offset adjustment. In both adjustments, the upper mount is being moved up or down (in relation to the chassis). This moves the car up or down, adjusting the ride height in turn. Due to the tight packaging for modern race cars, it’s very difficult to get a good picture of how these are mounted in a car, however I did find a way to show it. Below are two images, the first is a NASCAR-style Big Spring front suspension assembly, the second is an AFCO racing coil-over shock. The first image is actually a display at Hendrick Motorsports’ Museum, so if you’re ever in the Charlotte area, you can head over there and take a look at it in more detail if you like!
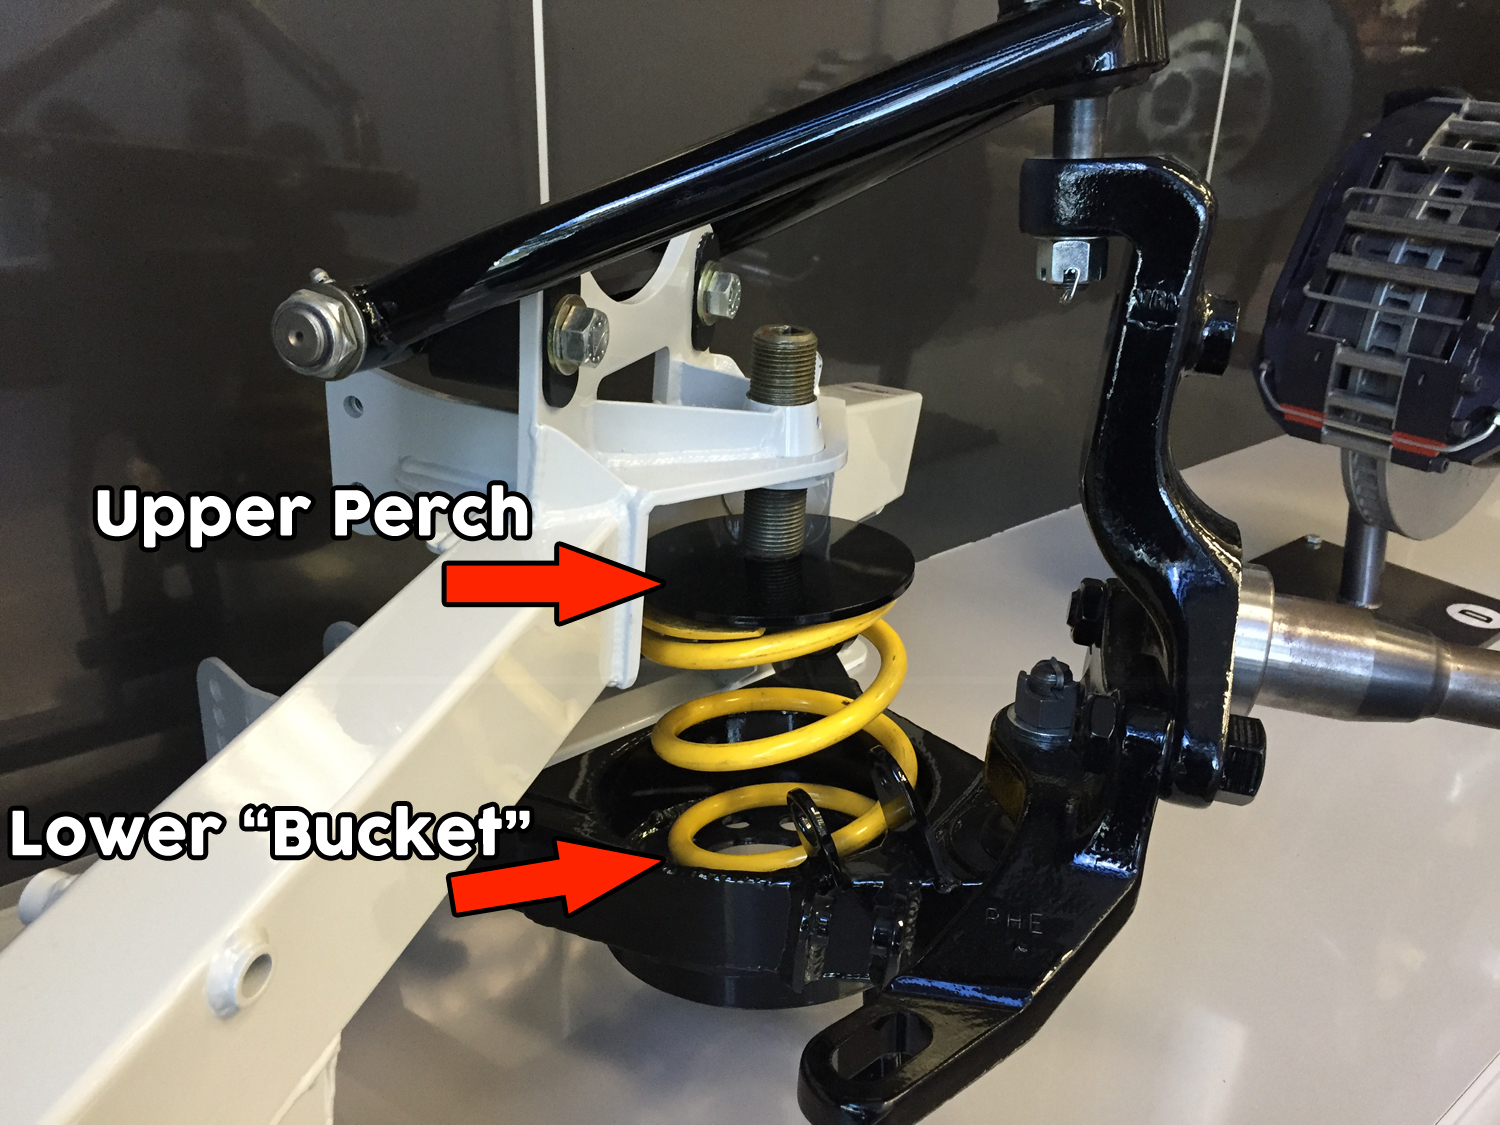
A typical “Big Spring” front suspension arrangement (shock removed) used in all three of NASCAR’s major touring series, but increasingly less-common on short tracks. The upper perch is highlighted at the top of the spring and the lower perch is machined into the suspension arm, also known as the “bucket”. A “Zero” setting on the Spring Perch Offset would have the upper perch as far up as possible. (Click for larger image)

A typical racing coil-over. The shock collar (highlighted with arrow) is adjustable by a threaded shock body and can be moved up or down by rotating the collar. A “zero” setting in this would have the collar all the way at the top of the shock body. (Cred. Speedwaymotors.com for image, AFCO racing shock)
The Spring Perch/Shock Collar Offset value is typically a measurement from a “zero” value for that component. For both of these, the zero setting would be where the perch or collar is as far up as it can possibly go in the adjustment range. Values are typically negative, since they are a distance downward from the zero setting. Any positive value would be an adjustment of the perch upward, any negative would be an adjustment downward. So for instance, if we have a Spring Perch Offset of -2.500″, we’ve set the upper perch 2.5 inches below its highest possible adjustment. This does not mean the spring is compressed 2.5 inches, and in fact has no meaning for the spring at all, it’s simply a way to locate the upper perch or shock collar.
This adjustment has a further use in allowing various length springs to be used in the same car. Springs are rarely manufactured at a specific height across a range of rates, and auto racing is no exception unless you’re willing to shell out a lot of money. In fact, the only exception to this I know of is Legends racing, where springs are required to either be 8″ or 10″ long, with the shocks having an adjustment to accommodate either length. Still, those springs will vary in length by a few tenths of an inch, especially if they’re showing signs of fatigue. Whenever you change spring rates, it’s more than likely going to introduce a new spring length in the process. This will always change the ride height on that corner, and to correct that you must reset the ride height using whatever spring perch adjustment is available. Failing to return ride heights to what they were prior to a spring change can introduce a lot of “adjustments” that weren’t intended, from sway bar preload changes, alignment, aerodynamic changes, and spring preload changes all around the car, so while you intended to change just a spring, you wind up changing the entire car if you don’t reset the height on that corner. It’s very simple, just use the perch or collar to change the height on that one corner (not the other three!!), and only takes a few seconds but will save you a lot of time and headache.
Spring Deflections
Spring deflection doesn’t have a major influence on your chassis setup, but it does need to be covered. I figured that the perch/collar offset section would be the best place to put it, since the deflection is in the same realm of thought as the perch offset. I know some guys who build their setups specifically off of the spring deflection values, and I know others who do not. Both approaches have worked well, even in the same cars, and both approaches won championship in the same car in 2016. Personally, I’ve found that a certain arrangement of deflections have worked best for me, which I’ll explain after going over deflection in general.
Deflection, in an engineering and physics situation, is the distance anything has moved from a point of equilibrium. Equilibrium being where this object is when no external forces are applied to it, deflection would be how deformed that object is once a force is applied to it. For example, if we have a beam that is perfectly straight with zero forces applied to it, it would be said to be in equilibrium, since all forces acting on it are “equal”. When we go and push on one end of the beam, it will “deflect” from that state of rest. In a spring, its length without an external force is its length in equilibrium. If we compress it by one inch through an external force, we now have one inch of spring deflection.
Knowing what we learned about springs in earlier articles, these spring deflection values are a way to look at the static force being exerted by the spring in the garage. The deflection in the garage is represented by two values, typically in this format:
4.896 in of 7.850 in
The first number is how much our spring is deflected, the second number is how much travel is available in the spring. So, in this case, we have about 2.954″ of travel left in the spring before binding. The first number can be further used to determine the static force from the spring itself by simply multiplying it by the spring’s rate. So if the spring in this situation is a 500lb/in spring, 500 x 4.896 = 2448 pounds.
In my own experience, I’ve found that a certain arrangement of static forces wind up producing a setup that I like, while setups that don’t fit this arrangement don’t do what I would like for them to do. At the end of the 2016 Class B season, I gathered all the setup files I’d used in the full 33-race season and calculated the static forces from the springs on each car. I knew which setups I liked and which ones I didn’t like, and for each set of static forces I calculated a “crossweight” force in the same way you’d calculate crossweight on the corner weights themselves. For the setups I liked, this value showed as between 48% and 49%, while the setups I disliked the most were above 52%. This isn’t a hard-and-fast rule, and the figure is hardly “real”, but the trend was surprising, and a prime example of why testing is important in finding what you like in the car. I can now take this information and apply it to 2017 with the intention to fix the tracks I struggled at this season.
~~~~~~~~~~~~~~~~~~~~
Images used in this article were sourced from:
-#48 Lowe’s Chevrolet Images: Jayski.com
-AFCO Racing Shock: Speedwaymotors.com
To keep up to date with The Commodore’s Garage, return to Sim Racing News every Friday afternoon and “Like” our page at https://www.facebook.com/CommodoresGarage

You may also like...


OFFICIAL PARTNERS:


")

Customize Cookie Settings
Performance Cookies
These cookies gather data on how visitors use this website – which pages are visited most often, for example.
Functional Cookies
These cookies remember website preferences and generally improve the performance of the site for the user.
Marketing Cookies
These cookies are used to provide a customized experience and can be used to provide targeted ads through advertising networks.

Enhance Your Experience with Cookies
We use cookies to improve your site experience. Customize your cookie preferences below.
Copyright © 2024 iRacing.com Motorsport Simulations, LLC. All Rights Reserved.