

Commodore’s Garage #22 – Shocks!
March 24th, 2017 by Matt Holden
If you’ve watched enough racing, there’s a good chance you’ve heard at least one team mention that they’ve got a new “shock package”. There’s also a good chance that team was either significantly faster or far more terrible than they were on the old shock package. Shocks have that power in bunches, and a good understanding of how the shocks are affecting a race car can often make the difference between a good day and a “let’s just go home” kind of day. While they appear very simplistic from the outside, a shock’s internal operation can be tremendously complex, leading most teams to have a dedicated shock specialist for each car with the knowledge of how to adjust and rebuild shocks on the fly. Cale Gale, founder of Gale Force Racing, did just that for years in NASCAR’s Xfinity and Camping World Truck Series before turning his focus to the highly-competitive world of short track oval racing. I can attest to the sheer complexity of racing shocks thanks to my years working for US Legend Cars International. When I started working there, I knew almost nothing about shocks, but my boss was nice enough to let me sit in the Bilstein trailer at Charlotte Motor Speedway every now and then and watch the shock guys do their thing.
Shock Operation
 Before ever diving into how shock adjustments work, we need to understand what’s going on inside the shock body. To the right is a cutaway image of a very simple shock with all of the major components labeled. For most racing shocks, we have the shock body separated into two chambers: The fluid chamber and the gas chamber. The fluid chamber is filled with some kind of oil that the piston passes through while the suspension is in travel. The second chamber holds a pressurized gas that can help prevent bubbles forming in the fluid, which is really bad, mmkay?
Our main focus is going to be on the piston itself. Pistons are typically just metal disks with a specific pattern of holes drilled through to allow the fluid to pass through. One side of the piston will be known as the compression side, the other the rebound side, and the holes can vary in design for each side of a given piston to get the desired results. Finally, on either side of the piston is a stack of extremely thin metal shims. When I say “thin”, I mean thin. Penske Racing Shocks’ website sells a shim kit with thicknesses going from 0.020” to 0.004” (0.5mm to 0.1mm) with varying diameters. The arrangement of these shims controls the “high-speed” characteristics of the shock.
For adjustment purposes, most teams will consider only two situations for the shock: High-Speed and Low-Speed. Each speed setting will be considered in both compression (shock is getting shorter) and rebound (shock is getting longer), leading to a maximum of four adjustment options per shock: High-speed compression, Low-speed compression, High-speed rebound, and Low-speed rebound. Low-speed adjustments can be made in a variety of ways, but the most common is usually a needle in the shock shaft itself that opens or closes a “bleed” hole in the shaft. Closing the needle will result in a smaller passage for the shock oil, stiffening the shock. High-speed adjustments are usually made through the shim stack (and its preload) or the piston itself. At a given shock speed, the shims will buckle and open the larger holes in the piston. This allows more fluid through the piston and instantly changes the shock’s stiffness without external adjustments necessary.
Adjustment types
A shock’s complexity has led to many different types of adjustments available to teams, and the iRacing garage has followed that trend. Most of the shocks in the garage will have a clicker-type adjuster. This is simply a knob on the shock that adjusts the needle mentioned earlier, and literally clicks as it is turned. “Sweeps” is another type of adjustment, and is made in a similar fashion to the clicker adjuster, just without the clicks. All adjustment types will do the same thing, and in all cases a higher number is a higher stiffness for that given adjustment.
Low-Speed Adjustments
The majority of your handling-related shock adjustments will be on the low-speed side of the shock. For cars with only one shock adjustment (oval cars, some road cars), the garage adjustment is the low-speed adjustment. Even though we don’t have the vast adjustment range that a real-world team may have at their disposal, the shocks can still be used to effectively adjust for weather conditions or track state changes. While I don’t like to use the old “setup matrix” principle because of how quickly you can build yourself into a hole with them, the expression “Springs for rough tuning, shocks for fine tuning” does apply in this sense. If we think of track characteristics first, such as how bumpy the track is, how much banking the turns may have, or how important aerodynamics are, the springs will be the rough-tuning factor of our setup. Shocks will come into play once our springs are correct, and when we’re trying to get rid of issues related to suspension oscillations or weather conditions. (NOTE: NEVER, and I mean never, change a spring to adjust for weather conditions! There are other options that are more effective and less problematic to choose from.)
Starting with compression, the low-speed adjustment is in play whenever a wheel is traveling upwards into the car, with the shock getting shorter. This can be under braking, initial turn-in, banking increase, or when throttle is applied. When compression is increased on a given corner, the shock will exert more force on that specific corner in compression, placing more force on the tire while the shock is moving. Aerodynamically, this can be used to hold a corner of the car up for a longer amount of time during handling transition periods, such as during braking or throttle application. An example of how this can be used is at a high-banked, high-speed oval such as Bristol where the right-front suspension will experience high loads and travel very quickly. If the driver is experiencing oversteer on corner entry, an increase in right-front compression can apply more force to that tire and reduce oversteer on entry. Similarly, oversteer on the same corner’s exit can be reduced by lowering the right-rear compression and letting the car squat more onto the right-rear tire.
Low-speed Rebound changes the shock in expansion. This adjustment, unlike compression, does not directly affect the tire it is associated with, and instead affects the two tires adjacent to its corner. For example, if we adjust the RF rebound, we’ll see a dynamic load change on the LF and RR tires, with very little effect on the RF or LR tires. Rebound adjustments can be simplified and thought of as a see-saw (pictured below), with the adjusted corner being the low side of the see-saw (we’ll adjust the RF rebound here). In order to pull up on the RF corner, the low side of the see-saw, we need to push down on the high side of the see saw, which will put a very heavy load on the fulcrum of the see-saw, in this case the LF and RR corners of the car. This is a highly simplified example, but it’s good enough to explain what’s going on with the car.
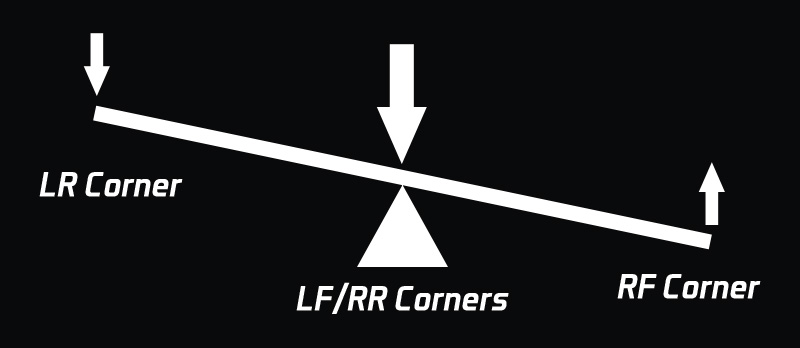
That explanation out of the way, the low-speed rebound settings are great ways to adjust the car’s dynamic crossweight while cornering. Increasing the LR rebound can decrease the dynamic crossweight at corner entry (more load on LF and RR) and help turn-in. Similarly, increasing RF rebound can decrease dynamic crossweight on throttle and help rotate the car on corner exit. Should you wish to tighten the car in these conditions, increasing rebound on the RR can help tighten up corner entry, while more LF rebound can tighten up exit. Below are two diagrams showing force changes on the wheels due to rebound adjustments.
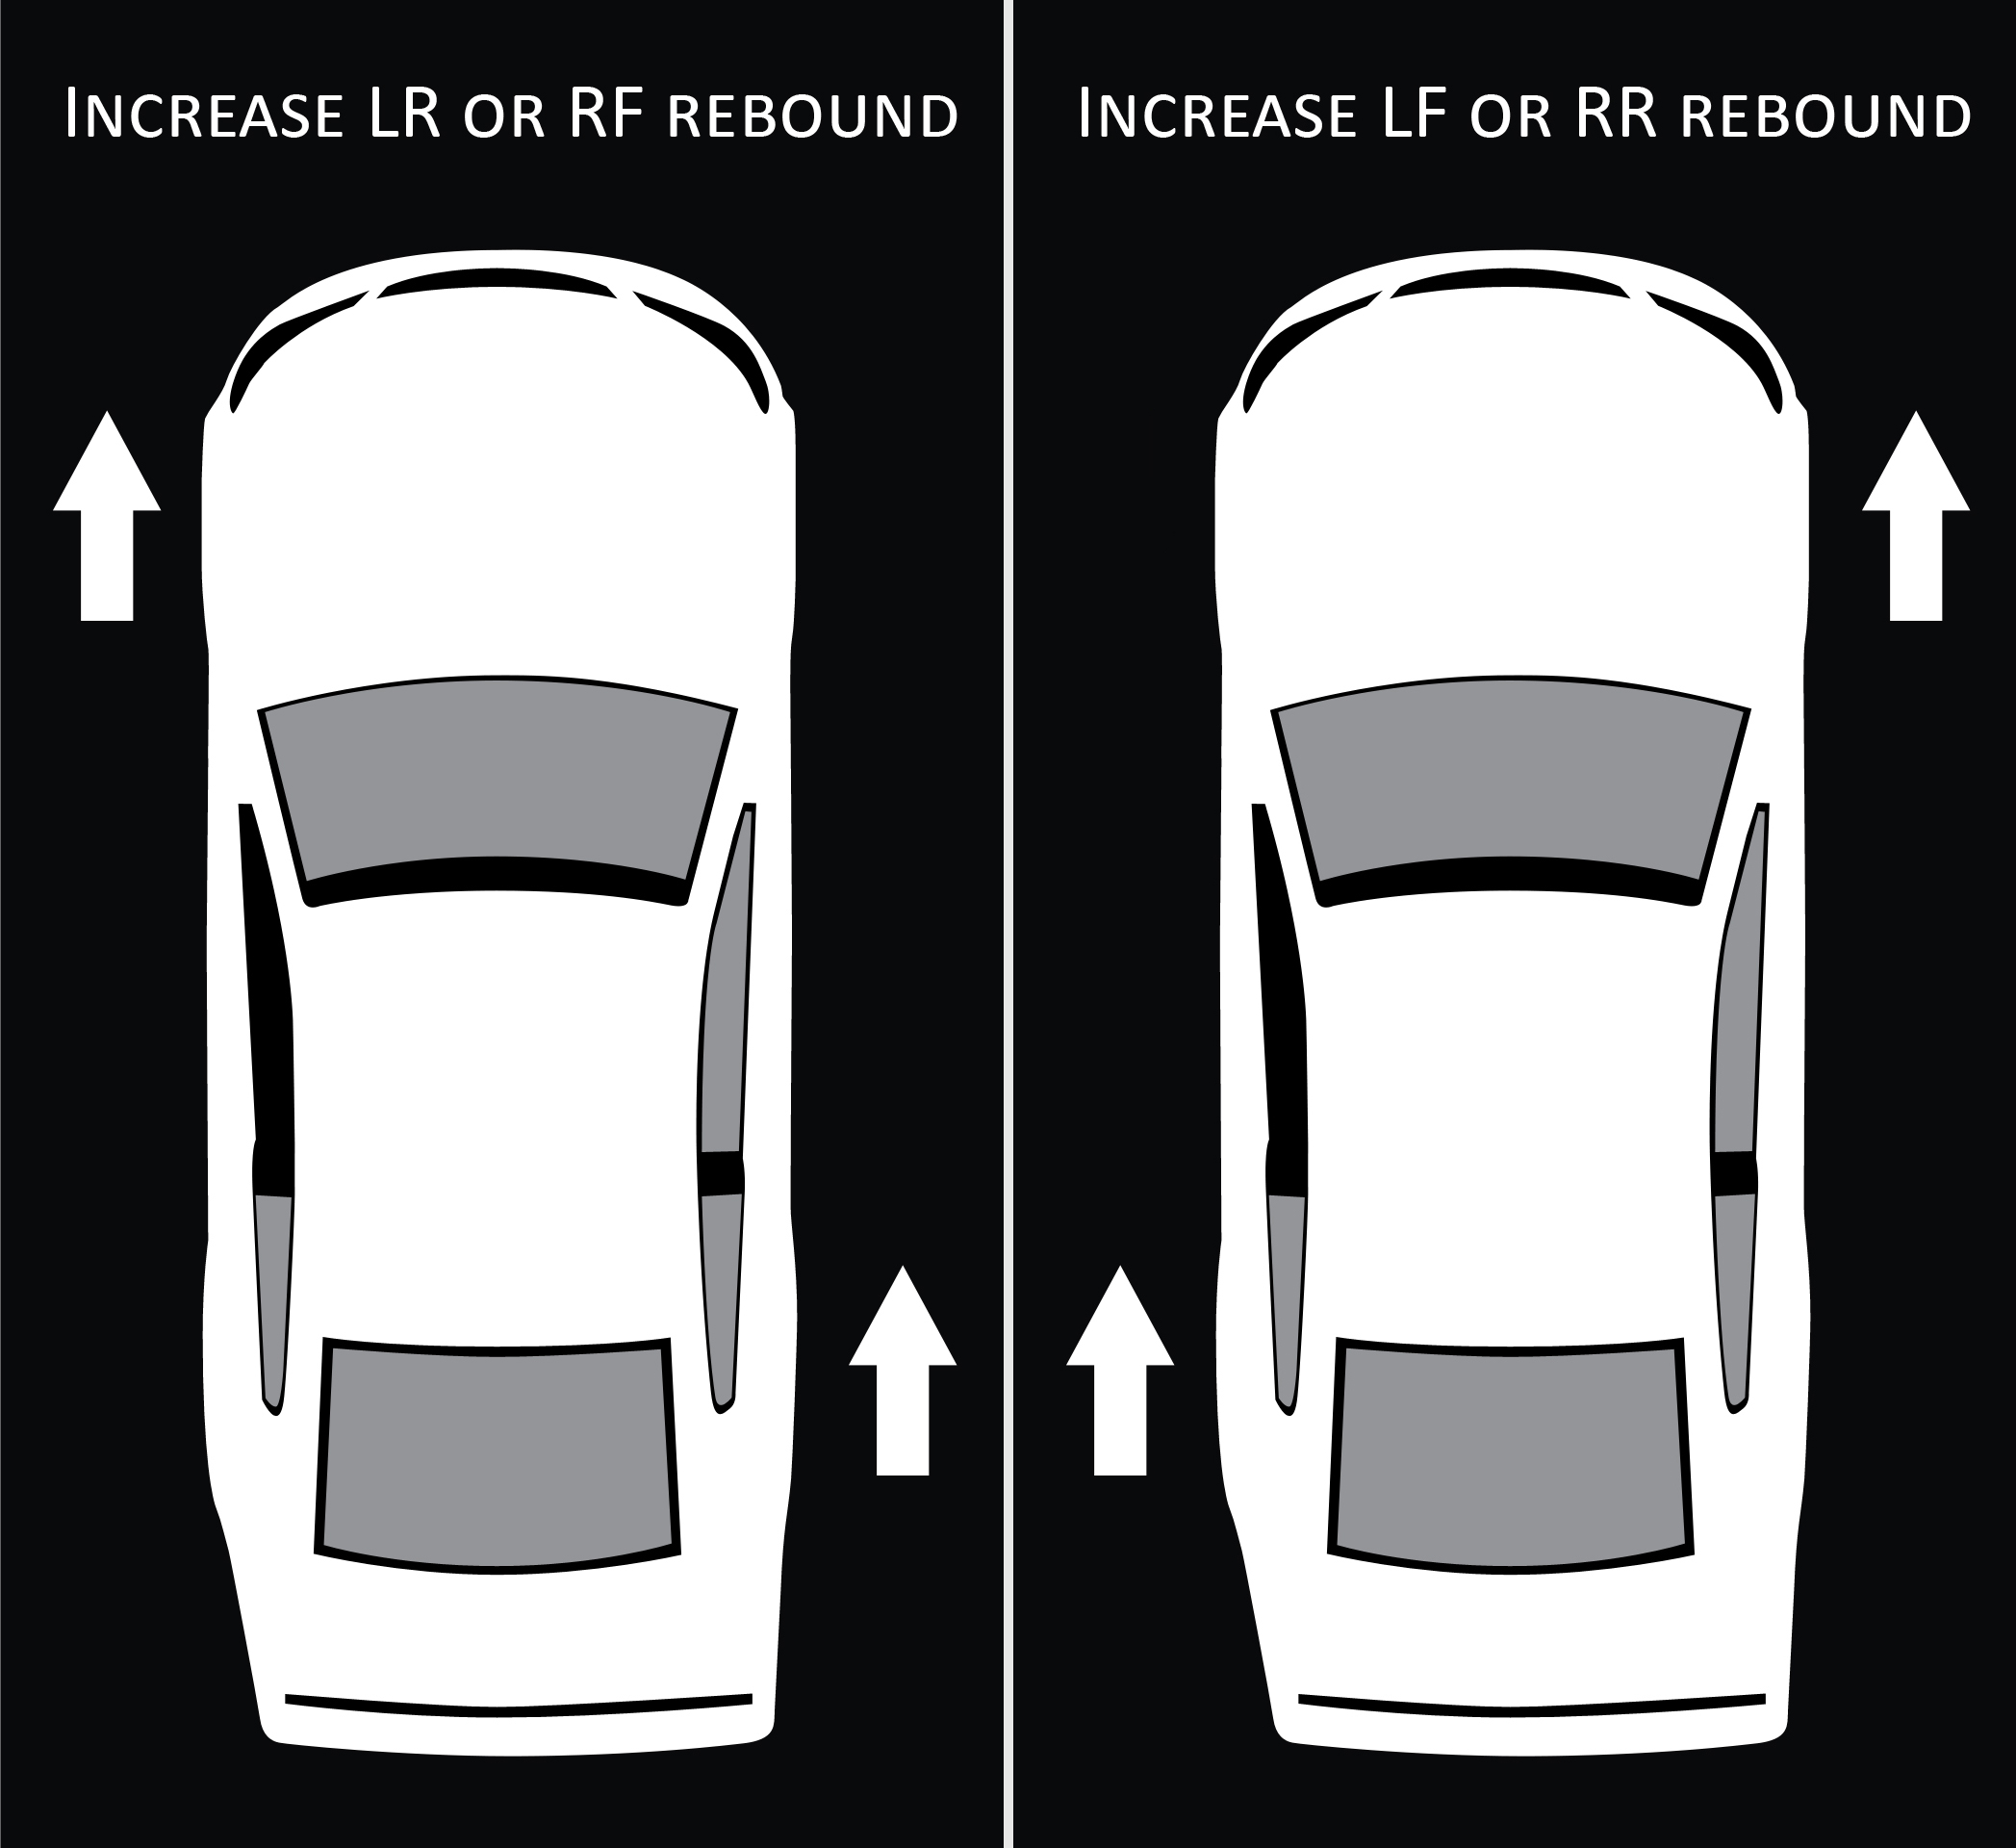
Force changes for a given rebound adjustment are represented here by arrows
High-Speed Adjustments
At a specific shock shaft speed, usually 3.0 inches-per-second or around that, the shock will switch from low-speed to high-speed conditions, and the damping forces will change dramatically. Most of the road racing cars now have this high-speed adjustment functionality, and tuning the high-speed settings can make an unpredictable car a little more predictable in most cases.
The major thing to making high-speed adjustments is knowing when the suspension is in this high-speed condition. If the shock is moving at 1.5 in/s, the high speed adjustment will have no effect at all. Conversely, if the shock is moving at 4 in/s, the low-speed adjustment will have no effect. This issue makes telemetry a gold-mine of information, since shock/damper velocity is one of the channels available to us from the iRacing software without having to do any math channels. If you don’t feel like bringing up telemetry for whatever reason, a general rule of thumb is that the shock will be in high-speed conditions over sharp bumps or whenever the driver is using the kerbs heavily. If something is happening outside the car and it is strong enough to physically move the car around, it’s probably a high-speed situation.

This is DEFINITELY a high-speed shock adjustment situation. Big kerb strikes can do this if you have them set wrong!
When compared to the low-speed adjustments, high-speed adjustments are much simpler. Since the forces that cause the shock to enter high-speed are usually very short in duration relative to low-speed forces, the main goal is to keep the tire in contact with the pavement during this time. In most cases, this involves having a much lower force at high-speed than at low-speed, which allows the shock to “blow out” over a sharp bump, allowing the suspension to compress quickly without making the wheel jump up from the track. Similarly, a lower high-speed rebound will help the suspension extend quickly after such an impact, keeping the tire in contact with the pavement. If a track is very smooth, in the case of newer pavement or relatively flat kerbs, stiff high-speed settings may help aerodynamically, but can be a major problem if a big bump is encountered.
Overall Considerations
The shocks should primarily be paired to the spring they’re associated with. After all, the shock’s primary job is to control the suspension and the spring. Softer springs will compress quickly and won’t expand as fast, so the shock should be a high-compression, lower rebound shock. Conversely, stiffer springs won’t compress quickly but will expand rapidly, needing a low-compression, high-rebound shock. In my Class B and Class A NASCAR setups, I have a general range of shocks for a given set of springs. For instance, if I use a 350-500lb/in spring, the shock will start with a 25c/10r shock, but a 1000lb/in spring will start with 10c/30r shock. These are typical starting points, and I’ll adjust each shock based on the track conditions and how the car is reacting.
Driver-specific options can also come into play with shock settings, specifically when a high-rebound shock is in the car. A prime example is between Alex Scribner and me when our left-rear oval shocks are considered. He prefers a higher compression with a lower rebound, while I prefer the opposite. This leads to multiple changes across both cars, and is one of the reasons why we simply cannot run each other’s setups. Don’t be afraid to play around with the shock arrangement and see if you prefer one configuration over another!
iRacing’s shock adjustments in the garage remove the more complex adjustments that real racing teams have to fight with on a weekly basis. Gas pressure, piston hole arrangement, shim stacks, and even shim preload are (thankfully) omitted. Could that appear some day? It’s very possible, and I remember a time when many people though adjustable bump stops would be too complex to appear in the garage. These things are very simple but very powerful, and you might be surprised at how effective they can be on any car.
~~~~~~~~~~~~~~~~~~~~
To keep up to date with The Commodore’s Garage, return to Sim Racing News every Friday afternoon and “Like” our page at https://www.facebook.com/CommodoresGarage

You may also like...


OFFICIAL PARTNERS:


")

Customize Cookie Settings
Performance Cookies
These cookies gather data on how visitors use this website – which pages are visited most often, for example.
Functional Cookies
These cookies remember website preferences and generally improve the performance of the site for the user.
Marketing Cookies
These cookies are used to provide a customized experience and can be used to provide targeted ads through advertising networks.

Enhance Your Experience with Cookies
We use cookies to improve your site experience. Customize your cookie preferences below.
Copyright © 2024 iRacing.com Motorsport Simulations, LLC. All Rights Reserved.