
Commodore’s Garage #30 – A Whole New World
December 15th, 2017 by Matt Holden
Did anybody else notice we have a new build? I know, it’s a surprise to me as well.
This year has been a year of major updates to iRacing’s stock car platforms, and we got a pretty big one right at the end. To look back at this same time last year and think about what we were doing then with setups and comparing it to what we’re doing now is wild. The setups we used at the end of 2016 were about as far from realistic as we could have gotten, and some of the setups my team used in this week’s Pro race at Atlanta were the most realistic I’ve seen in a simulator. As it turns out, I wasn’t alone in that thought so we must be doing something right.
Instead of going into great detail about what this build likes and doesn’t like behind the wheel (and diving into how one of our drivers was managing tires so well that he passed 20 cars in one tire stint in the Pro race), I’ll save that for later when we have a much better handle on what’s going on. The ugly truth is that we really don’t know what’s fast right now from a driving standpoint because there were so many approaches to it this week, all of them appearing in the lower splits of the Pro race. In time, however, some of those strategies will start to show which are better and which should be tossed aside. What we can look at is how this build has altered the garage and what new challenges have been thrown at us.
The “Must Know” – Crossweight
Crossweight is, easily, the most useful tool in the garage. It also takes a little while to get a hang of due to the complexity involved, and I’ve had a few people admit that they don’t understand how to change it. That’s not a big deal and it’s nothing to be ashamed of if you’ve never gotten a hang of it. I have no problems admitting that I still mess up so badly with crossweight changes that I have to stop and reload setups because I’ve missed something silly in the process.
Crossweight in an oval car is basically a multi-effect adjustment: It will cause multiple things to happen and all of those must be accounted for. Primarily, I will change crossweight to affect entry/exit bite with the center of the corner being ignored in the adjustment. Since crossweight is a figure of how much static weight is on the left-rear and left-front tires, it can be seen of how much those two tires are going to bite into the track while turning. Don’t forget that friction is in direct relation to vertical load, and more friction yields more lateral grip. Despite its effects on the right-front tire, primary concern is going to be placed on the rear tires with crossweight adjustment: Turn in handling is influenced heavily by right-rear loading and turn exit handling is influenced by left-rear loading. More right-rear loading is more oversteer, more left-rear loading is more traction. Unlike most things we look at, this is pretty straightforward.
If we look at Atlanta, where the Pro race was held this week, we have a track with an extremely low amount of grip but extremely high speeds. Static crossweight in our Cup cars was over 62% across the board and, believe it or not, that’s still probably a little low when realism is considered. Why it was that high is pretty simple: we needed traction and as much as we could get. When we take the cars to grippier tracks such as Charlotte and Kansas, we’ll see it much lower since we don’t need to generate the grip from the chassis. Speeds are also much higher at those tracks, meaning the car’s going to want to keep going straight so we’ll need a little help turning through lower crossweight.
Adjusting the crossweight is not simple, but it’s not necessarily super-difficult if you take your time and look at what’s going on. Since crossweight is adjusted through the spring perches (or shock collars) by altering spring preload at each corner, we also need to keep an eye on ride heights and the various torque preloads in the garage. In most cars, this is going to be the sway bar preload values but the NASCAR-style stock cars will have the rear end housing preload thrown in the mix as well. If any one of these things changes and is not corrected, then two separate settings will be changing the car’s handling instead of just the crossweight. Whenever I’m helping someone learn how to do this, I always suggest disconnecting the sway bar before making changes. Preload will still have to be corrected, but it keeps things simpler by preventing the tech inspection system from causing everything to start flashing. The steps involved are simple:
- Note the starting bar preload
- Disconnect the sway bar
- Make your crossweight change (equal number of “clicks” for each corner), click “Apply”
- Once the car has settled, reconnect the sway bar
- Adjust the bar’s preload back to what it was before
- (If necessary), correct the rear-end housing preload to legal limits
And that’s it. If you followed those steps then you should have a new crossweight value with the same bar preload and ride heights that haven’t changed very much at all. For a quick reminder on the perch and collar settings to change crossweight, see the images below:
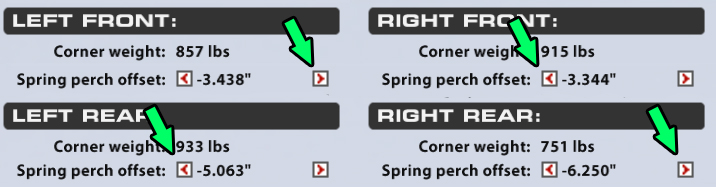
Use these settings to INCREASE static crossweight in the car.
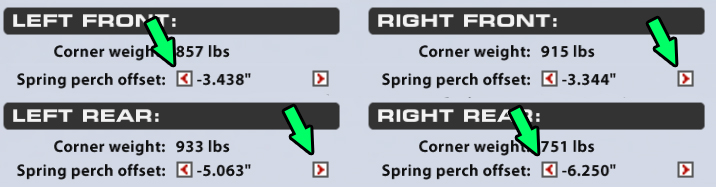
Use these settings to DECREASE static crossweight in the car.
These adjustments known, it’s important to understand that these specific changes will not affect every car in the same way. We have various adjustment methods for the various cars, such as spring perch offsets, shock collar offset, and torsion bar stops. It’s important to know what you’re changing before you start clicking to prevent confusion and massive problems. A “right-click” on the right-rear will not always decrease weight on that corner, so make sure you know which click does what!
Crossweight is likely going to become a much more varied setting in the garage going forward due to the added degradation on the tire changes with the Top-3 NASCAR series. In the 2017 NASCAR Class B series I ran 55-56% crossweight on my car at nearly every race on the calendar, tuning the balance through track bar height and ballast. There were a few races where I experimented with rear spring configurations toward the end of the season, but the crossweight was largely kept constant because I didn’t want to re-set bump stop gaps every week. The new build could put more emphasis on tire management, meaning spring choices are going to be more critical to long-run performance. Finding the arrangement that helps you maintain tire life throughout a run would mean keeping that arrangement from race to race, something seen a lot in the real-world. This would place handling in the hands of weight distribution and shocks which is, go figure, more realistic than changing springs for handling.
The only other important effect of changing crossweight is how it affects deflections in the front suspension, specifically bump stop gap and coil-bind timing. There’s a fun saying “You could coil-bind any spring with enough crossweight”, which references the increase in deflection on the right-front spring for increasing crossweight. Similarly, decreasing crossweight will increase deflection on the left-front spring. You can use this to your advantage to fine-tune splitter height in the Truck for coil-binding as well as fine-tune bump stop gaps to control corner loads. However, if you’d prefer those to stay the same, you need to make sure you keep the same amount of gap before and after a crossweight change. For bump stops this is dealt with using packers, but for coil-binding you may have to change the spring entirely to one with more or less travel.
Tie-Downs
We’ve waited a long time for an increase in shock forces and we finally have it. The forces on the Xfinity car and Truck are much higher than what we had before, and the Cup car has what seems to be a mild increase. Interestingly enough, it also seems like we have more range than is necessary! Personally I like this since it means we have to find the optimum setting instead of pegging the shocks at 32/32 and running it without a care.
None of the tracks we run on are perfectly smooth, meaning the suspension still needs to do some work (even at Kansas) to keep the tires in contact with the track. This not only means soaking up bumps with compression but also allowing the wheels back down to get ready for the next bump. Whenever the wheels don’t get released after a bump we wind up with a car that starts bouncing uncontrollably, and that’s exactly what we’ve seen with too much rebound in these cars. For shorter races and runs, we can get away with this because of the aerodynamic advantage of a low and steady splitter height. For longer races and lengthy green flag runs the tires need to be abused as little as possible and allowed to go with the flow, so to speak.
Exact numbers are still a mystery, and the extra rebound allows new setup arrangements that we’ve never been able to run before. What works and what doesn’t will be largely dependent on what springs you choose and how bumpy the track is. So, while we are still in the ignorance stage of this build, it’s pretty safe to say that “32 Rebound” is limited in its uses these days.
Now for some fun stuff…
Season 1 at the Commodore’s Garage
The winter season offers a unique situation where none of us at Gale Force Racing are actually racing. In years past these months have been filled with baseline testing and diagnosing issues that cropped up through the year. This year we’re going to do something different: Alex Scribner, Jeffrey Parker, and I are going to crash the party in the Class C Trucks this winter. Instead of just racing in the series, however, we’re going to document the setup process in my truck, with the majority of the details written up the in the Garage articles over the next few months. Starting next week at Myrtle Beach you’ll not only be able to see what’s going on with our trucks, but you can run the same thing in yours while learning what went in to every decision from the sway bar to the track bar. Hope to see you on the track!

The Commodore’s Garage Silverado will hit the track next week at Myrtle Beach. Follow along with the setup process in the next group of articles!
~~~~~~~~~~~~~~~~~~~~
To keep up to date with The Commodore’s Garage, return to Sim Racing News every other Friday afternoon and “Like” our page at https://www.facebook.com/CommodoresGarage

You may also like...


OFFICIAL PARTNERS:


")

Customize Cookie Settings
Performance Cookies
These cookies gather data on how visitors use this website – which pages are visited most often, for example.
Functional Cookies
These cookies remember website preferences and generally improve the performance of the site for the user.
Marketing Cookies
These cookies are used to provide a customized experience and can be used to provide targeted ads through advertising networks.

Enhance Your Experience with Cookies
We use cookies to improve your site experience. Customize your cookie preferences below.
Copyright © 2024 iRacing.com Motorsport Simulations, LLC. All Rights Reserved.