

Commodore’s Garage #19 – Crossweight
February 10th, 2017 by Matt Holden
Last week we looked at bump stops, but this week we’re going to cover weight distribution, specifically crossweight. Why would we move straight from springs to crossweight? When we dive deeper into bump stops (specifically shims, gap, and contact timing), preloads, and shocks, crossweight is going to come into play a lot. And I mean a LOT. Crossweight is a very simple concept but, along with many other things, past racing sims have over-simplified it to the point where you can run into problems in the iRacing garage. Racing is about details, and making sure all the details are correct before you ever hit the track. One of the most important details is the weight distribution because it plays so heavily into handling. An error in how the crossweight was set can make or break your race, even if everything else on the car is perfect.
What is Crossweight?
Crossweight is the percentage of weight in the car situated on the right-front and left-tires. The percentage is calculated by adding the weight on these two tires and dividing that value by the total weight of the car (See diagram). While this is commonly kept at or around 50% for road racing cars, oval racing cars can vary wildly from car to car within the same class of racing. Values above 50% can be thought of as “positive” crossweight, values below 50% can be thought of as “negative” crossweight.
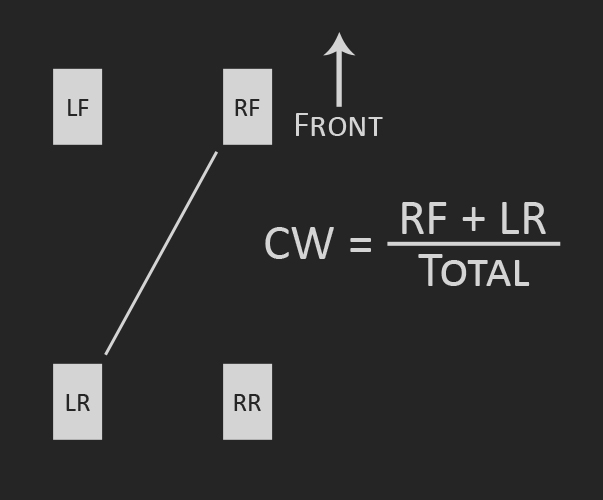
Crossweight percentage calculation
The way crossweight is represented for a given series or type of car can be wildly different. Indy Cars and Dirt Oval cars are the most dramatic departure from the common crossweight percentage value. Both of these cars typically represent crossweight as a value of weight for a specific tire on the car. For Indy Cars, this value is the amount of weight on the left-front relative to the right-front. iRacing’s garage for the DW12 represents crossweight as “xx lbs to the left front”. For instance, if that value read as “-100 lbs to the left front”, then the left-front tire has 100 pounds less on it than the right-front. Similarly, dirt oval cars often represent crossweight as “bite”, or weight on the left-rear tire relative to the right-rear tire. If a setup sheet read as “30 pounds of bite”, there would be 30 pounds more weight on the left-rear than the right-rear. These are both ways to represent the same thing, and a crossweight percentage can still be derived from the individual corner weights if desired.
Effects of Crossweight
While the normal “more crossweight = tighter” is a guideline, it is by no means a law. Crossweight, by itself, is not an indication of whether or not a car will be tight or loose and should not be treated as such. Crossweight, instead, is used in conjunction with spring rates, nose weight, left-side weight, and track characteristics. Typically, a higher nose weight will need a lower crossweight to keep the car going around the track, while a lower nose weight will need a higher crossweight. Similarly, cars with higher left-side weights can get away with a higher crossweight.
Crossweight is often a key factor in forward traction, however, and is usually tailored to a track’s characteristics. Specifically, bumpiness and grip level offered by the surface itself. Since crossweight adds weight to the left-rear tire, this provides more traction while on throttle (which is why Dirt folks call it “bite”). Bumpy, low grip, tracks such as Five Flags Speedway or Atlanta Motor Speedway don’t offer large amounts of grip, so crossweight is set higher at these tracks to make the car a little more stable over bumps and while the car is sliding on the worn out surfaces. Newer tracks, or very smooth tracks, such as Kansas or Southern National, allow for lower crossweight to be used since the track has enough grip to provide traction without help from the car. Diving further into track characteristics, higher banking will allow for lower crossweight due to the extra grip from vertical loading, while flat tracks such as Langley will have higher crossweight to provide extra bite off the flat corners.
One of the biggest chassis setup factors to determining crossweight is spring “split”, or difference in spring rates left-to-right on the car, which is covered later in this article.
Adjusting Crossweight
Before setting the initial crossweight in the car, it’s necessary to know how to adjust the spring perches consistently around the car, in close to equal values, to keep everything constant. If one perch is adjusted, then a second one must be adjusted as well. Proper crossweight settings are made by adjusting all four, and doing so will keep ride heights consistent while changing only crossweight. To decrease crossweight, we need to use the following adjustment buttons in the iRacing garage:

Decreasing Crossweight involves these four buttons in the setup garage
When using these four buttons, make sure the ride heights stay about the same for each trip around the car. Different spring values and heights will result in different amounts of weight for a single click (a 500lb/in spring will have a different result per click than a 1000 lb/in spring). Whenever you’re close to the desired crossweight value, adjust only one end of the car instead of the entire car. Typically, the rear of the car is easier to work with than the front, and will prevent any issues with aerodynamics coming into play.
To increase crossweight, we simply use the other set of buttons:

Increasing Crossweight uses the buttons opposite those used to decrease Crossweight
Similarly, we need to keep the ride heights constant, and switch to the back of the car for finer adjustment.
Setting Crossweight
If our car is equipped with sway bars of any kind, it will have two crossweight values throughout the setup process: Bar attached and Bar detached. Since preloading a sway bar will directly affect crossweight as well as spring preloads, it’s very important to know (and set) initial crossweight with the bar(s) detached while knowing how much crossweight is desired once the bar is attached. Doing so will eliminate issues that can be masked by preloads introduced during the setup process. For instance in a NASCAR-style stock car: if we set the ride heights, springs, and crossweight with the bar attached, it will preload the sway bar and the rear axle housing. Once we have what we’re looking for with that, we’ll then have to reduce preloads on the bar and axle housing to where we want them, which will change the crossweight again. This will result in a see-saw of crossweight and preload adjustments until we have the numbers we’re looking for. However, more likely than not, the spring deflections, bump stop gaps, and alignments will all be completely wrong, causing the car to drive very poorly and abuse the tires through a lengthy run.

These are the values you need to be concerned with for crossweight. Knowing the detached crossweight value is very important when building a setup.
Above is an image of the iRacing setup garage with only the necessary items for setting crossweight. Here we can see the crossweight set initially at 49.5% with the bar detached. When the bar is attached, however, we get this:

Attaching the bar will change the crossweight, and it’s important to have everything in line before and after attaching the bar.
We now have an increase in crossweight of 4% and large changes in corner weight values, but no adjustments made to the spring perches themselves. This is not bad, and is going to happen in every single car, but it’s an example of what needs to be considered during the setup process. Whenever you start to build a setup, you should already have an idea of how much preload you want in the bar as well as a general idea of what you want the static crossweight to be. In this case pictured, I wanted 200 ft-lbs of preload and a crossweight of 53.5%. I managed to get both remarkably close, and I have everything set where I want it to be set.
Doing this is fairly simple, but involves paying close attention to everything in the garage screen while you do it:
- Start by detaching the sway bar and allowing the car to settle. At this point you should already have the springs you want in the car and have set the ride heights where you want them.
- Using the Spring Perch Offset values, adjust the crossweight to a standard value. Something like 50% will make this very simple. Adjusting the crossweight using the four perches to keep ride height constant is very important! (See above images) Record this starting crossweight value.
- Next, attach the bar and set the preload value you want. Allow the car to settle, and note the new crossweight value as well as ride height differences (How much did the left-side raise with preload?).
- Find the difference in the preloaded crossweight value and the initial crossweight value, which will give you the crossweight added from the bar’s preload.
- Now that you know how much crossweight changes, you can subtract that from your desired crossweight to get your “detached crossweight”. Detach the bar and adjust the crossweight to this detached value, attach the bar, preload it, and you should be at your desired crossweight.
So…I know that’s confusing, so here are the same steps with my example values to give a visual:
- Set the car at 50% crossweight with the bar detached (our desired CW is 53.5% when complete).
- Attach the sway bar and preload it to 200 ft-lbs, allow the car to settle.
- The preload increased the CW by 4%, so now we’ll detach the bar and allow the car to settle again.
- Since we want 53.5% and the bar added 4%, we’ll need to start the car at 49.5%. Detach the bar, let the car settle, and adjust the crossweight to remove 0.5% of cross from the car. It should settle at 49.5%.
- Re-attach the bar, preload it to ~200 ft-lbs, and the crossweight should now be at or around 53.5%
Head still spinning? That’s okay! I’ve had requests for videos to tie in to these articles, and this is going to be the first video to help explain how to do this.
Dynamic Crossweight
It’s important to understand that crossweight, unlike nose and left-side bias, is (typically) not adjusted by moving physical weights, or ballast, around in the car. Instead, a combination of spring preload (static compression force) and twisting preload on the sway bar and axle housing cause forces in the suspension to be redistributed, resulting in one corner of the car’s suspension to support more weight than another corner. Since there is no physical object to associate the crossweight with in the car, its value is purely dynamic and will change as the car moves through travel, through steering inputs, and as the suspension encounters bumps and track features.
This dynamic crossweight will be different based on not only springs and shocks, but also driving styles. I mentioned earlier that crossweight is not indicative of a car’s handling characteristics by itself, and that I’d give an example:
In 2016, my team began racing in the NASCAR iRacing Class B Series full-time. We quickly discovered that, with 3-5 drivers per week, a single setup was only going to favor one of the drivers while hurting the others. We began tailoring individual setups per driver with different springs, shocks, and weight distributions. By mid-season, all of the drivers were running up front despite all the cars being different. There was a phrase we had: “If we have five cars on track, we have five different setups on track.”

Even though both Alex Scribner and I had similar tire temperature readouts at 1.5-mile tracks in 2016, the springs and crossweight on our respective cars were extremely different.
Of all the cars we built for that season, none were more different than the cars Alex Scribner and I drove. Alex’s driving style differed from mine so much that we could not race each other’s cars save for Iowa, where we ran identical cars. All other tracks were totally different. The major issue was corner entry, where Alex’s steering input and line often resulted in more load on the right-rear, while my line produced a heavier load on the right-front. Since Nick Ottinger and I share a very similar issue, we already knew how to handle it: larger rear spring split and higher crossweight for my cars. Where Alex ran anywhere from 400-600 lb/in of rear spring split, I ran between 800 and 1000 lb/in of spring split in the rear. This difference alone meant that my crossweight was often 2-4% higher than Alex’s cars due to the softer left-rear spring.
This led to something very counter-intuitive based on the common sim-racing ideas: Despite Alex’s cars having a lower crossweight, they were much tighter than my cars when I drove them. Similarly, Alex always said my cars were extremely loose, despite a higher crossweight. In fact, everyone said my cars were very loose even though I ran the highest crossweight of anybody in that season. This is a prime example of how crossweight does not directly indicate a car’s handling characteristics and must be treated as part of the entire setup package. Follow the steps I’ve shown here and you’ll wind up with a much more consistent setup process as well as eliminating nagging issues that would otherwise cause headaches for weeks.
~~~~~~~~~~~~~~~~~~~~
To keep up to date with The Commodore’s Garage, return to Sim Racing News every Friday afternoon and “Like” our page at https://www.facebook.com/CommodoresGarage

You may also like...


OFFICIAL PARTNERS:


")

Customize Cookie Settings
Performance Cookies
These cookies gather data on how visitors use this website – which pages are visited most often, for example.
Functional Cookies
These cookies remember website preferences and generally improve the performance of the site for the user.
Marketing Cookies
These cookies are used to provide a customized experience and can be used to provide targeted ads through advertising networks.

Enhance Your Experience with Cookies
We use cookies to improve your site experience. Customize your cookie preferences below.
Copyright © 2024 iRacing.com Motorsport Simulations, LLC. All Rights Reserved.