

Behind the Scenes: The NASCAR Peak Antifreeze Series powered by iRacing.com – For the Alpha: the Omega, Part 1
June 10th, 2015 by Jaime Baker
There’s no denying the fact that the garage system iRacing introduced to the sim racing world back in 2008 turned said world on its ear. While it has yet to be adopted by other racing sims as of yet, it remains the most realistic environment for racecar setup work on a simulated platform. In older sims like NR2003 or rFactor, and even newer players in the market such as Project CARS, setup work is simple, and just requires a few clicks of a mouse or moving a slider. The real world is not like that at all, and if I had a trophy for every time I adjusted the toe-out on my kart and forgot to reset the camber, I’d have as many trophies as the guy who didn’t forget that. It’s real, it’s complex, and it’s generated the question I get asked more than anything else: Where do you start?
Unsurprisingly, nobody has ever really liked my answer to this question, but it’s very simple: I start with where I want to finish. Just like when you’re planning a vacation, or even a trip to the grocery store, before you ever leave you already know where you’re going to go. No airline pilot has ever left the ground and then said, “Alright, where are we headed?” My father is a pilot and I’ve flown with him many times. Every single flight has been preceded with a lengthy planning process. He starts with where he’s going, gets the weather, the radio information, any navigation tidbits, fuel, payload, etc. The setup process works in exactly the same way. You have to know what you want to end-up with before you ever get started.

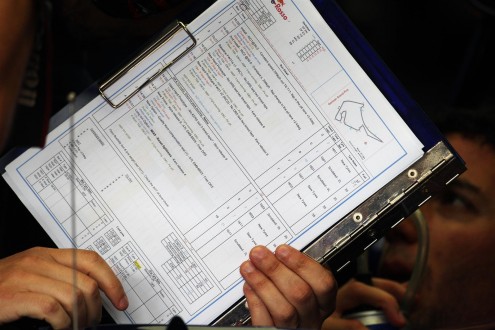
Engineers go over tons of data from a NASCAR Sprint Cup test at Charlotte. Data such as this is often compared to simulations to check the accuracy of the simulation, thus making the race weekend much easier.
“But how do I know where I want to end up?” Well, this has been a little muddled by racing television broadcasts. All of them say the drivers are looking for a “certain feel,” which technically is an end to what they’re going for, but in reality the engineers and mechanics know what the car needs to do, how the suspension needs to be arranged, and finally how the aerodynamics have to work in order to achieve that “certain feel.” For the driver, it’s just a few hours of a bad car and suddenly they have a good car, and for the TV viewer, it’s just a few hours of a car sliding around with men turning random wrenches when, suddenly, the car’s amazing. While this was actually the case behind-the-scenes in NASCAR’s 80s and 90s era, this is a heavily veiled look at operations in today’s era. I feel I should mention that this article will be a two-parter. We’ll start with the initial setup work, then the second part will cover moving from track-to-track.
To find what you want to end up with, you have to actually know what you want to end up with first. This is the trial-and-error stage, typically the only major hurdle for anyone who wants to learn how the setup process works. It’s worth noting that I’m not talking about handling at this point: I’m talking about the rough-setup process before a car is ever fine-tuned for a race. In the real world, we have 7-posts, wind tunnels and simulations. In simulators, we can crash the car and not have to explain why your idea was worth trashing a $300,000 race car. Luckily that part is free! I’ll walk you through the process that resulted in the setup I mentioned in the last article, built specifically for the NASCAR PEAK Antifreeze Series race at Daytona.
To find what you want to end up with, you have to actually know what you want to end up with first.
Like I said in the last installment of Behind the Scenes, that setup was a one-off; it was never intended to be raced outside of Daytona, and it hasn’t been raced outside of Daytona at all. The setup process for that car started one month before, after the Daytona race for the NASCAR iRacing.com Pro Series. The setup for that race was fast, but was lacking in a few key areas that needed to be addressed. I recorded my view in one of our team’s test runs in the setup and posted it on YouTube, which I’m going to reference a few times.
Immediately apparent is the chassis strikes in the corner. Anything touching the pavement is unnecessary drag, so we definitely needed to get rid of this. Also, more eagle-eyed viewers will notice an RPM drop of around 200-300 rpm entering Turns 1 and 3, a sign of some kind of drag that is pulling the engine down. This is confirmed with a late “unwind” of the steering, showing the chassis to be very tight, likely causing the drag. The final thing to notice is very late in the video. I eventually make my way up through the pack and reach the lead, only to stall out and drop back. This is typically a sign that the car is aerodynamically inefficient, since it was fast with no air, but very tight and slow in a clean air stream. Interestingly, this is the opposite of what causes the racing we see today, where cars are very efficient in clean air and aren’t efficient in dirty air, but that’s for another article. Still, from just these three things, we know our goals and where we need to end up. We want a car that is 1) aerodynamically efficient, 2) mechanically free for dirty-air maneuvering and 3) makes as little pavement contact as possible while still achieving #1. With that, we get started on building the setup!
The world-famous Toro Rosso “oh s**t” moment: Their test plan for the German Grand Prix. This shows a full schedule of the day’s test session for one of their cars.
The image above is famous. It’s a picture of Toro Rosso’s Formula 1 testing schedule for the German Grand Prix with driver Daniel Ricciardo, taken during the 2012 season. This is not usually something you’d want a photographer to get an image of, especially one this clear. It documents the day’s testing schedule, down to the minute, of each thing the team wants to do to the car, how they want it done, and any extra details for each step of the day. A quick run-down of what it says:
-Two “installation” runs, usually to get the car’s systems checked and warmed up, both run at a constant 200kph with both runs ending in a 2.4° front wing adjustment. Both runs on the same set of tires.
-The third run is a baseline test on the installation tires without DRS activation, likely a validation test for the simulations.
-The fourth run involves a tire change to the “New Hard Prototype,” likely a new tire Pirelli wants to run in Germany, but exactly the same as run #3. This would be a direct tire comparison to compare the two
After another set of new tires is tested, they made some adjustments to the differential and sent it out again for more testing. This, while tedious in the sim-racing world, is how to really get things done correctly. We know the issues that were present in our Daytona Pro car, so we need a schedule to plan out how to get rid of those issues and make the car better. This is actually fairly simple, and you can do it in whatever order you want to, but I typically order everything so that handling is the final thing on the list. For the Daytona car, if the above issues are considered “the list,” I worked in the order 3-1-2: I first got it off the pavement, then tuned for aerodynamics, then tuned for mechanical responsiveness and stability.
This, while tedious in the sim-racing world, is how to really get things done correctly.
This developed problems in itself, especially since the NASCAR PEAK Antifreeze Series race was run during the daytime and the Pro Series race was run at night. This produced different aerodynamic and mechanical forces, so I first, like the Toro Rosso image, had to make validation runs to see what was different due to weather. Once that was done, it was a simple matter of raising the car until it stopped hitting the pavement. Since it was the rear of the car that was hitting the pavement, this marked the lowest point the rear could be before striking the track and creating drag. This does NOT, however, identify where the rear needs to be. In the real world, we could easily simulate this in the shop on a 7-post rig.
Once the rear was “off” the track, I then had to find the best aerodynamic attitude to create the least drag possible while still having enough downforce to make the car responsive to inputs. It is possible to remove so much drag that the car no longer responds, and we definitely don’t want that at Daytona. So this was simply a process of adjusting the rear of the car (while keeping the nose at the same point) until the car behaved the best. This gave us the needed chassis rake for the car. In the real world, we would do this in a wind-tunnel. Once the rake was achieved, it was a matter of lowering the car back down until it hit the pavement, then raising it back up icrementally to clear. This put the car in the best aerodynamic position we could find.
Engineers determined this aerodynamic attitude long before this car ever hit the track. While we don’t have a wind tunnel in iRacing, it’s simple enough to do the same work in the sim.
So, once the aerodynamics were complete, it was time to start on the suspension. None of the springs were chosen for handling purposes at all. Unlike older chassis, today’s race cars rarely use the springs for handling purposes. It’s strictly to maintain aerodynamic efficiency, so we wind up with incredibly rigid formula cars at Monza, violent bumps at Le Mans . . . and very happy dentists after a 400-miler at Kentucky. The same thought process went into our development, as we selected springs that would hold the car at the desired aerodynamic attitude throughout the run. Mechanical handling was dialed-in using weight distribution and alignment, just like in the real-world. Obviously I had to tackle other issues such as fuel burnoff (which affected the splitter height), tire pressure buildup and a long list of other things, but I can’t give away all the secrets!
So after weeks of testing, something like 700 laps by myself around the 2.5-mile track, the setup went into two cars without being altered from how I built it. The result? Both cars were in the top 10 after only 13 laps, one challenging for the lead at one point, the other finishing 10th after starting 23rd. So why was it a one-off? Daytona and Talladega have a different aero-package than other tracks, with longer tail panels and a smaller spoiler. This made the aerodynamic attitude for Daytona useless at every other track. And Talladega? Those races were run on an all-new suspension package, so the springs were different.
It seems like a huge waste of time when all that’s considered, but it really wasn’t, simply because the process worked very well, so the same process can be used anywhere else. As I explained about how my dad prepares to fly somewhere, his planning process results in landing at the airport he intended to go to without problems. In the same way, my process ultimately resulted in the car that I wanted when I started, so it wasn’t a waste at all. But if we left Daytona with nothing besides what was basically a checklist, how do we apply that to the other 17 online races on the NASCAR PEAK Antifreeze Series calendar? I think I know what the next article will be about!

You may also like...


OFFICIAL PARTNERS:


")