

Commodore’s Garage #29 – Shocking!
September 16th, 2017 by Matt Holden
In oval sim-racing, shock settings get overlooked quite frequently. They’re a cure-all for most cases on the road racing side of things, but why are they typically set to their extremes and ignored for oval cars? Few people ever take the time to go through the shocks and see how they might affect the car’s handling and speed, leaving easy speed on the table for most cars. Is it the complexity or the belief that they don’t do anything? Who knows, but fiddling with the shock settings to get them matched to your track conditions and spring package can be worth a few tenths with very little effort.
The Basics
Shock absorbers are used in passenger cars to dampen (hence the name “Damper”) vibrations and oscillations before they reach the driver. This gives the car a pleasant and enjoyable ride for the passengers. From a performance aspect, the driver’s comfort is rarely a concern; however the shocks will still be built to smooth out some bumps and knocks that would upset the car. In some cases, shocks may be built so stiff that they don’t allow for much body movement, seen primarily in short-track oval racing.
Basic operations within the shock are very simple: A piston moves up and down through a fluid, with the valves in the piston controlling how much fluid can pass through the piston. Allowing more fluid produces a softer shock, restricting the fluid flow is a stiffer shock. How much fluid passes through the shock piston can be broken down further into what’s known as “High-Speed” and “Low-Speed” adjustments, and knowing when each adjustment is necessary is very important when tuning shocks. There are situations where a high-speed adjustment is necessary, and times when a low-speed adjustment is necessary, but each are independent.
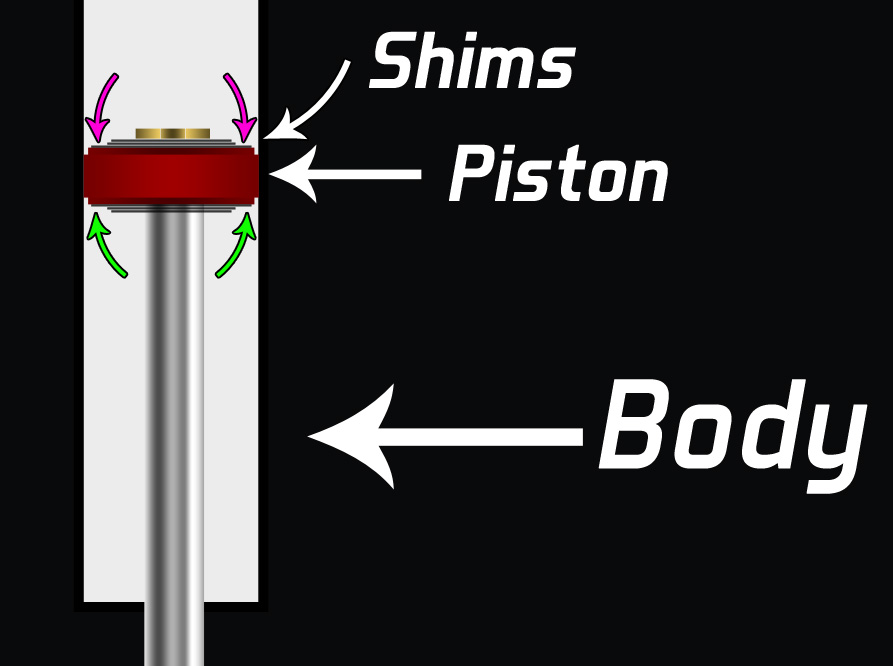
Low-speed shock operation
Pictured here is a simple cutaway drawing of a shock piston inside the shock body. I’ve added arrows to indicate the various parts we’re concerned with, as well as colored arrows to indicate fluid flow through the piston. In low-speed operation, fluid will travel through holes on the outer edges of the piston (“bleed” holes), which are fairly small relative to the high-speed holes. The green arrows represent fluid flow in rebound, and the pink arrows represent fluid flow in compression. Typically, low-speed behavior takes place when the shock piston is moving less than 2.0-3.0 in/s (50-75 mm/s).
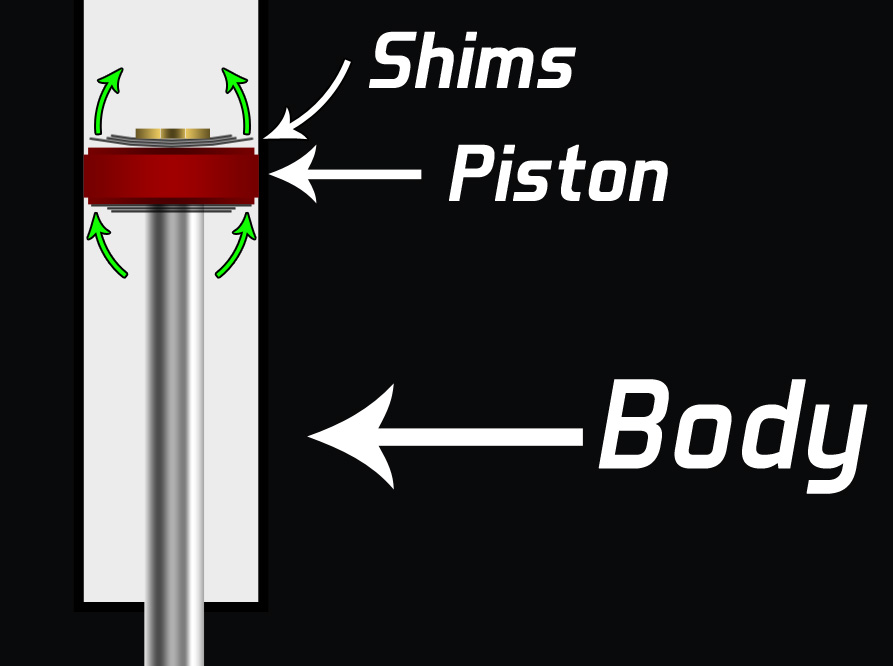
High-speed shock operation
When the piston exceeds the speeds for low-speed operation it enters high-speed operation. Pictured above is the piston in a high-speed situation. At this point, a stack of very thin metallic shims will “pop” open and expose larger holes on the piston face, allowing more fluid to travel through the shock at the higher speeds. The science behind high-speed shock settings is almost infinite, with various shim arrangements and piston hole configurations determining how the shock behaves at the higher speed range of operation. Hopefully you can see why Shock Specialists are a necessary job position on most racing teams by now.
It’s important to know that shocks do not behave at all like a spring does. Shocks are intended to keep the spring from oscillating out of control when encounters a bump or body movement, exerting a force to counter the oscillation. While springs operate in a linear force vs. displacement behavior (one single force for a given deflection), shock deflection is completely irrelevant in the force it will exert. Instead, shocks exert force based on piston velocity. For a given piston speed, it will exert this amount of force. For example, while a spring may exert 100 pounds at 1 inch of deflection, a shock may exert 100 pounds at 1 inch-per-second. The unit used to describe shocks is thus the pound-per-inch-per-second (lb/in/s), or Newton-per-meter-per-second (N/m/s).
Adjustments
What we have available for adjustments in the iRacing garage is the adjustment that would be available to a team while the car is sitting in the garage bay. For most cars, this is the “click” or “sweep”. Some cars have both high- and low-speed adjustments, while some just have a low-speed adjustment. If it isn’t explicitly stated which speed the adjustment is then it’s a low-speed adjustment.
Regardless of the adjustment, the mechanics behind the adjustment is usually fairly consistent. An adjuster knob at the bottom of the shock will move a needle within the shock shaft and effectively close or open the low-speed bleed holes in the piston. Higher numbers close the valves and make the shock stiffer in that adjustment and lower numbers will open the holes and soften the shock. Some cars have a “sweep” adjuster which is a very similar internal adjustment, however the adjustment knob usually won’t have clicks built in to give definitive adjustment steps on the real shock. It’s not tremendously important to know which adjustment you’re working with because they’re the same for our situation, but it’s important to understand that one “click” on one car may not be the same as a “click” on another car. Testing is important to figure out how much the car is affected by a single adjustment increment.
Spring Pairing
Like I said at the beginning of the article, a shock’s primary job is to control suspension oscillations. To get this, we want to pair the shocks with the spring on that corner of the car to get the proper amount of control over the spring. If the shock is too stiff then the car can start bouncing, but if it’s too soft it could be very floppy and unresponsive to driver inputs.
Luckily, this part is fairly simple when compared to the rest of the things to know for shocks. We can split it into two categories: Stiff springs and Soft springs, with everything else falling somewhere in between. Stiff springs will resist compression very easily due to the higher rates, so the shock doesn’t need a lot of compression to control movement. On the other hand, a heavy-rate spring will want to return to equilibrium very quickly, and with a lot of enthusiasm, so a heavier rebound setting is necessary to keep it from violently returning to its happy place. If we flip it all around and look at a softer spring, the spring won’t resist compression, so we need more compression to keep the car from slamming down onto the track. Unlike the stiff spring, a softer spring won’t try to return to static height very quickly due to aerodynamics and track loading, so extremely high rebound is not necessary.
Adjusting Shocks
Shock adjustments will come in two flavors: Compression and Rebound. Compression (also “bump”) is when the shock is in…well, compression. Anything that causes the shock to shorten will be handled by the shock’s Compression settings. The opposite, expansion, is known as Rebound. This is anything that causes the shock to expand, typically spring rates or hill crests. Each of these is then broken into high- and low-speed adjustments which are fairly simple: High-speed adjustments control bumps and low-speed adjustments control body motion.
The most common adjustment you’ll see in the garage is low-speed adjustment. These adjustments control the car in what’s known as “transition”, essentially whenever the car is pitching or rolling due to driver inputs. When the driver hits the brakes and the car dives, or the driver hits the throttle and the car squats, this is within the realm of low-speed adjustments. Low-speed adjustments can also handle large changes in track shape such as hills or crests, but not sharp bumps.
We’ll start with the simplest option, low-speed compression, because it’s about as straight-forward as it can get. Higher compression values will slow body motion and delay full weight transfer for a situation. If the driver slams on the brakes, for instance, weight is going to transfer forward to the front tires and the car will dive. If we add compression to the front shocks, the severity of the dive will be reduced, and the opposite will occur if we reduce compression. The primary concern with compression settings is to not have dive or squat happen too quickly. If this is too severe the car will change handling balance extremely quickly and could cause the car to spin or do something else silly. If the dive and squat are restricted too much, weight transfer necessary for cornering won’t happen and corner speeds will suffer. In most cases, all we’re looking for with compression is a smooth and consistent transition to driver inputs and not much more.
Asymmetric compression adjustments can also be used to temporarily load one of the outside tires during corner entry and exit, something more common with oval cars or on banked turns. The shock will exert a force under compression which will make its way to the tire (as well as resist the body motion), and this force can be used to add or remove load from a tire. A great example where this is common is a very high-banked oval such as Bristol, where the banking and speeds introduce a lot of load very quickly. If a driver is loose, or oversteering, on entry to the corners, more compression on the right-front can load the tire more under braking and entry to the banking to give a little more security. Similarly, a driver who is tight, or understeering, off the corners can increase the right-rear compression and put a tiny bit more weight on that tire to help it rotate. This isn’t a fix-all by any means, but the adjustment is typically made for security reasons when a driver feels like the car is “on the edge”.
Rebound settings become much more complex because of how they operate. Similar to compression in dive and roll, rebound should be set to keep the car from lifting too quickly with driver inputs. However, if rebound is too stiff then the wheels won’t be allowed to extend as they’re unloaded which could cause them to unload completely and lose grip. That’s bad. Obviously there are some aero considerations with rebound as well, so keeping the aero-platform smooth is very important as well. Remember: Keep the car smooth in transition and all will be well.
Again, as with almost every oval car, rebound settings can do some funky junk. If a rebound adjustment is made asymmetrically, it will affect the diagonally-opposite tires. This means if you adjust the left-rear rebound, the load difference will occur on the left-front and right-rear tires. It’s easiest to think of the entire car as a diagonal see-saw, with the fulcrum across the left-front and right rear tires. A force that pushes down on the right-front will pull up on the left-rear, and the other two tires will be the axis around which this occurs, so if we increase the resistance on the left-rear, we wind up increasing the load on the left-front and right-rear more than the load on the left-rear, where the adjustment was made. The same thing would happen if we made the same adjustment on the right-front shock as well. Below is an illustration of what happens:
This effect is very commonly used to manipulate dynamic crossweight in transition. If the car is tight on entry, more left-rear rebound will load the left-front and right-rear tires, which reduces the crossweight while the shock is moving. Similarly, if the car is tight on exit, more right-front rebound will help the car turn off the corner. If the car is loose on entry, more right-rear rebound will tighten it in the same way that more left-front rebound will tighten the car on corner exit.
High Speed Adjustment
Finally, we get to High Speed adjustments. Since these only come into play at high piston speeds, the only way to get a result from these is to hit a sharp bump. This almost never happens on ovals where we’d need to adjust for it, but it’s very common in road racing over corner curbs (or Kerbs, for the rest of the world). High speed adjustments are intended to allow the shocks to “blow out”, essentially reduce force suddenly, when the suspension encounters a sudden bump. The force itself isn’t lower than low-speed, but it’s lower than what it would have been if the low-speed linearity continued. There’s not much handling influence here outside of keeping the wheel in contact without moving the rest of the car, so if a bump or kerb causes the car to jump up, a reduction in high-speed compression would help this. Similarly, we also want the wheel to return to its normal position, so reducing high-speed rebound would help out here as well. As with low-speed, we don’t want to over-damp anything, just have enough to keep the tires working.

At GFR, we spent a lot of time working with the Ferrari 488’s high-speed shock adjustment to allow aggressive use of the kerbs during the 2017 24 Hours of Le Mans
Don’t be afraid to play!
I’ll leave you with a reminder: Don’t be afraid to try a shock adjustment. For most cars, it’s the only adjustment in the garage that won’t change the rest of the car, making it the easiest adjustment you can make! The fixed setups and baselines may have min or max settings, but that’s rarely the fastest setting available to you, so don’t be afraid to move the shocks around and soften one corner for bumps or stiffen one corner for aero.
~~~~~~~~~~~~~~~~~~~~
To keep up to date with The Commodore’s Garage, return to Sim Racing News every other Friday afternoon and “Like” our page at https://www.facebook.com/CommodoresGarage

You may also like...


OFFICIAL PARTNERS:


")