The Kitchen Sink: Dallara DW12 – Indianapolis Motor Speedway
May 21st, 2014 by Jaime Baker
This week I had the unique pleasure and opportunity of sitting down with iRacing.com’s Eric Hudec. First, let me just say, Eric is one of the most accommodating people I have ever interviewed. He took time out of his work day to sit down with me for an hour and a half and describe every nuance between the “old” Dallara IR03/05 and the Dallara DW12.
So, let me take this opportunity to say thank you Eric. For your time and for the amazing work you do for this community. Without Eric, this piece simply wouldn’t have been possible. Many of the things I thought I understood were misconceived notions. Some things were right, but certainly some things were wrong.
First of all, let me just say that the setups included in the iRacing.com folder for this new car are near perfection. The advanced set is in fact capable of low 39.4s at the Indianapolis Motor Speedway in the default weather. I am going to set this up very similarly to how I did my initial article for the old car, since we have such a good setup already.
GENERAL
Weight Jacker: Just as in the past, the weight jacker raises and lowers the right rear of the car. This adds preload to the shock and causes the car to handle differently. Negative weight jacker will lower the right rear ride height and make the car handle a bit tighter. Positive weight jacker will raise the ride height and make the car a bit looser. The weight jacker does not do as much as it used to do on the old car; the changes it makes now are about half of what the old Dallara was capable of.
Gearing: You want to get the most out of your engine’s torque band in the corners and straights. The IndyCar’s highest torque is at the 9000 RPM range, which is where you will suffer the most wheel spin. The highest horse power figures occur in this car between 11500 and 12000 RPM. Between those revs, the power curve is relatively flat. So, you ideally want a gear that almost bounces off the rev limiter at the end of a straight.
Tire Pressures: Unlike the previous car, you cannot simply run maxed out tire pressures. It appears the reason for this is because of the need for mechanical grip with how trimmed-out the aero package has to be run. The left side seems to be able to be run near the maximum, however.
AERODYNAMICS
The aerodynamics on the DW12 are much different than the Dallara IR03/05. Unlike the old car, we have the ability to run negative wing angles and there are also different ways the wicker is setup for this car.
Front Aero: The front of the car is important to getting the car around the corner without understeering. However, it also is important to not run too much to prevent oversteer, as well as excessive drag. So far, I have not seen the use of front wicker, but it could be used combined with lower front wing angles to provide a better downforce and drag ratio.
Underside Aero: The diffuser exit wicker is a piece that seals the area between the undertray and the diffuser. This decreases downforce and drag by not allowing the diffuser to contribute as much to the sidewall and strakes. Speaking of sidewall and strakes, they are aerodynamic pieces which provide a lot of downforce. The diffuser sidewalls are the aerodynamic pieces which guide the airflow at the trailing edge of the car. These are sort of those fins at the back of the car that really help through the corners.
Rear Aero: There are a lot of pieces to the rear wing now. Just like the real cars, we can lay the rear wings to negative angles while still generating downforce due to the shape of the wing. Due to a change the span and height of the wicker on the new car, we now have preset pieces rather than being able to make slight/incremental changes. Now, there are full and half spin wickers. All of these wickers add downforce to the rear in finer adjustments than major wing angle changes. You can use these to add downforce while optimizing downforce and drag ratios. Another new piece is the radiator covers. It’s probably a good idea to run them as sealed as possible, this will provide extra downforce and less drag. Think of it as grill tape on the NASCAR cars . . .
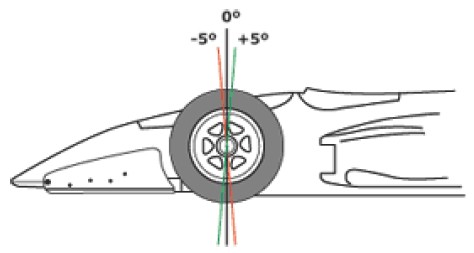
Camber: Use this to address your tire wear and heat issues. Use negative right side, and positive left side on an oval. Generally I aim for the two left-most patches of each tire to be within 1-3 degrees of each other. You do not want the middle of your tire overheating, and here is why: If your right rear middle is hot, you will spin out; your right front too hot, you will understeer. Also, if you’re inner-most patches are too worn you will wear your tires down and lose some speed. Left sides are similar, but less important (but don’t ignore them!). Camber can also adjust cross weight, and on this new car it is only adjustable in large increments rather than slight deviations.
Caster: Caster changes the way in which your tires operate. Many people use it to replace excess camber to help with car handling and still keep the tires in decent shape. Generally the right front will run higher than the left front. Caster changes the axis along which the tire steers. Let us think about motorcycles for a second. An Orange County chopper generally has a very laid back steering axis: the bars are long. This makes the bike stable in a straight line and at higher speeds. Turns? Not so much. A motorcross bike however, has a very upright steering axis, which allows for it to be maneuverable. As you may have noticed, we have two front wheels, so it’s a bit different than with motorcyles. Higher caster helps exacerbate the effects of the steering wheel.
FRONT
Anti-Roll bar: The anti rollbar is an important part of the IndyCar’s suspension. One important thing to know is that having NO anti-rollbar will, in fact, loosen-up your car, and as you increase it, it will get tighter. Simple enough right? Nope. You WANT to have a front sway bar on your car for qualifying at the least, because without it your car will lose speed, despite the improved handling. Normally you lose this speed from corner exit where your car carries its momentum to the left a bit, rather than straightening-up nicely out of the corner. For qualifying, keep your ARB as high as possible to where you can drive the car comfortably. For race, the same applies, but if tire wear is an issue, consider dropping it for the long
run.
Anti-Roll bar Blades/arms: If an anti-roll bar is your shoe, then the ARB Arms are your shoelaces. The higher you go on the ARB arms, the tighter the front of the car. The ARB arms are adjustable “in car,” but I would set them in the garage to a value that lets you pass tech inspection the most easily, so that you can adjust things on your car (such as cross weight) that are more favorable. Adjust these to your liking; they are more minute adjustments than an entire anti-roll bar change, but do have speedand handling effects that are similar.
ARB Preload is the torque the suspension geometry has on the ARB. I don’t touch this unless for passing tech, or if I need to make a handling change. Think of it as potential energy in a way; it can add to handling issues depending on the polarity of the magnitude. I am usually near zero with this number.
Brake Bias: Run this near 50 to avoid locking-up or sliding entering the pits on your green flag stops. This is personal preference; I usually run a bit above 50 to prevent the rear from stepping out.
Toe-in: With the new car now offering assymetrical toes, it is interesting to see how drivers will setup their toes. Generally, the tire that does not bear as much load can afford to have a slightly higher slip angle than the one carrying the higher load. In this case, that would be the left front versus the right front. Ideally, you would want the right front as straight as possible, and the left front to work a bit harder to carry the car around the corner. Negative in the left front means the tire points to the left. Negative on the right means the tire points to the right. Adjust this to get your car through the corner and help you where you need it. Using 0 at the front will slightly help straightaway speeds but might hurt your turn in.
Ballast Forward: Ballast forward shifts load forward or backward on the car. At its furthest forward position it will bring the car to a 50/50 front and rear weight distribution. Ideally you would run this as far back as possible without getting oversteer. This is to keep the front tires light and enable you to around the corners quickly. However, at Indianapolis the car could slide too much with the weight too far back, so you need to settle for a bit of understeer.
Ride height, pull rods, and springs: This is pretty specific to the high speed tracks. Our target for this area of the suspension is to maximize rake while not having to lower the rear ride height to a point where it drags, fails tech, or makes the car uncontrollable. For those of you who do not know, rake is the difference between the front and rear ride heights. Also, the setup needs to help control the tilt of the car. Generally a higher nose will lead to greater straight away speeds. Find a compromise for speed and handling by lowering the nose until it is comfortable and gets you around the track quickly. With the DW12, ride height bottoming out can be detected on both sides of the car and not just on an average. So, we cannot afford to run the left side high while reaping the benefits of a lower right side. Now, we must control the tilt by keeping the left side a bit lower than the right.
The front springs need to be soft enough to control mechanical grip but hard enough to keep the aero consistent and to keep the car from losing speed upon shock compression and body inertia transfer. If you lower the right front spring it can help with some understeer. Raising it should add understeer, but that depends on the corner. Push rod lengths adjust the height of the ride on each corner of the car. Use these to fine tune your ride height and get the handling spot on.
REAR
Anti-roll bars: I recommend running an anti-roll bar in the rear because your car will be quite tight without one. However, remember it is sometimes good to have one to keep the rear tied together as you come off of a corner. The rear ARB has the opposite effect to the front ARB: raising the rear ARB will make your car a bit freer, and lowering it will make it tigther.
Anti roll bar arms: These have the same effect in magnitude (but in the opposite direction) as the front ARB arms in relation to their portion of the car. Raising the rear one will make your car freer. Adjust as your run goes on, for starts, or for pitting if you need to.
ARB Preload: aim for zero, but if you need to have a bit to change handling on certain parts of the track it doesn’t hurt too much. Usually mine is the opposite of what I have in the front in direction, but of a similar magnitude.
Rear toe: When adjusting rear toe, consider it sort of like steering. You are fixing your wheels at an angle at which it will affect how the car drives. Generally you want your rear tires to be helping you turn into the corner, unless you suffer from oversteer (then you make want to try the other direction in an attempt to gain your speed on exit instead). But, because here we suffer from understeer, we will mostly use largely positive numbers on the left rear and largely negative on the right rear. The illustration below shows what a negative left rear and positive right rear value would do. This would cause understeer at Indianapolis, on the old car which favored understeer this was common practice. On the new Dallara, the opposite direction is preferred because it helps the car maintain its handling off the corner.
Ride height, pull rods, and springs: An adjustment to the pull rods in the rear can have some handling and aerodynamic consequences. In short, spring rates at the rear can be used to fixhandling issues that develop either as tires come up to temperature, or in general. Raising the right rear spring rate will cause a bit more oversteer; lowering it will cause a bit more understeer by allowing the tire to compress more on bumps and transitions. Raising the left rear should also tighten the car up, as it is the diagonal equivalent of raising the right front spring, which would cause understeer. Lowering the left rear would cause some more oversteer. The pull rods will adjust ride height, just like in the front. Lowering the right rear will cause understeer; raising it will tend to produce oversteer. Vice versa for the left rear; also, it helps control the car’s aero.
Dampers: Possibly the greatest change compared to the older Dallara are the dampers. Instead of having rebound and bump for each tire, now we have compression (bump) and rebound for each tire. But, there are separate dampers for low speed movements (<10 inches per second) and high speed movements (>10 inches per second). Low speed dampers work in situations such as gforce, corner loads, and downforce – transient movements in the corners mostly. High speed dampers provide spring control over bumps or curbs. The dampers used by iRacing use negative integers for adjustments. This is just because the brand used by iRacing preferred to label their increments in such a manner.
“If you want more body control or faster transient effects increase low speed damping,” says Eric. “If you want better rough surface or better curb performance reduce high speed damping.” A bit more simply, if you want your car to handle better on relatively smooth track, look at low speed dampening. If you want your car to handle better on curbs or bumps, then high speed dampening is the area you should address. Dampers seem to have a bigger effect on this new car than the old one. Remember I mentioned in the past we used to use dampers to manipulate the cross weight? On the new car dampers will not change cross weight (nor, according to Eric, should they have on the old car).
RECOMMENDATIONS
While talking with Eric he mentioned that a good idea would be acknowledge that raising the front ride height will be a bit higher in a straight line. Lowering that ride height to gain handling is a compromise. This is important to remember at a flat track like Indianapolis because it does have long straights. But if you lose a ton of time in the corners and cannot carry speed onto the straights, then that will hurt you more than having too much downforce. Also, don’t forget to adjust your weight jackers, different in every corner if need be! Remember to practice in race trim with a bunch of cars, because the new aero wash on these cars and the slip stream is pretty amazing. If you are following in the draft you can expect some understeer.


