

Commodore’s Garage #28 – The 2016 Class B Champion
August 11th, 2017 by Matt Holden

Setup details at the top of the sim-racing ladder are a closely-guarded secret; we all have experienced it at some point. Earlier this year, I had a conversation with the crew chief of the car that has won a few recent NASCAR Modified championships about chassis setup, and he willingly gave me the spring rates on his car for the three packages they run in a year. No questions asked, just a simple “Here they are!” Anybody who’s been in sim-racing for a decent amount of time knows that this would never happen, so why would he just hand over his car’s setup to some guy that struck up a conversation? The key is what he didn’t tell me about the car: shocks and suspension geometry. In real-world racing, you can hand someone the springs, weight distribution, and even alignment values for your car, and it’s unlikely that they’re going to be able to make it work immediately. Our Modified Crew Chief friend never told me where the roll-center in the front suspension was located; he never told me how his shocks were built. Without that information, the springs, weight, tire pressures, and everything else was essentially useless to me. If you want to go even deeper, I recently went on a tour of a top-level NASCAR team and when I fired off the random question about springs, I was literally handed the largest sway bar they use as well as told the rate of the stiffest bump spring they had in the shop. All of this was totally useless to me because I didn’t have the important information to go make those things work in a car.
Sim-racing doesn’t work like that though: we all have the same suspension geometry, we all have the same chassis, we all have the same shocks. This means that if you gave me the four (or six) spring rates on your car, I could make your car in a relatively short amount of time. The speed in the NASCAR Cup Series is rooted in team secrets like flexible truck arms or track bar mounts, while the secrets to Sim-racing speed lie in the setup itself. Last year, following a team test in April, I found a bit of information on the then-current build for iRacing’s NASCAR Class B Xfinity cars that went into Alex Scribner’s car later in the year. This setup was used in almost every single race from his first win at Indianapolis until Homestead, and then modified slightly for the start of 2017. While we were doing some gnarly witchcraft in the NASCAR PEAK Antifreeze Series with pre-binding, Alex’s car was about as ordinary as it could be. Now, just like the pre-bind setup, it’s been made obsolete by build updates. A lot of people tried to say it was full of tricks and secrets, but that really wasn’t the case. It was about as ordinary as could be. Let’s take a look at it, and see what made it work well enough that it snagged the 2016 NASCAR iRacing Class B Championship.
Front End Springs
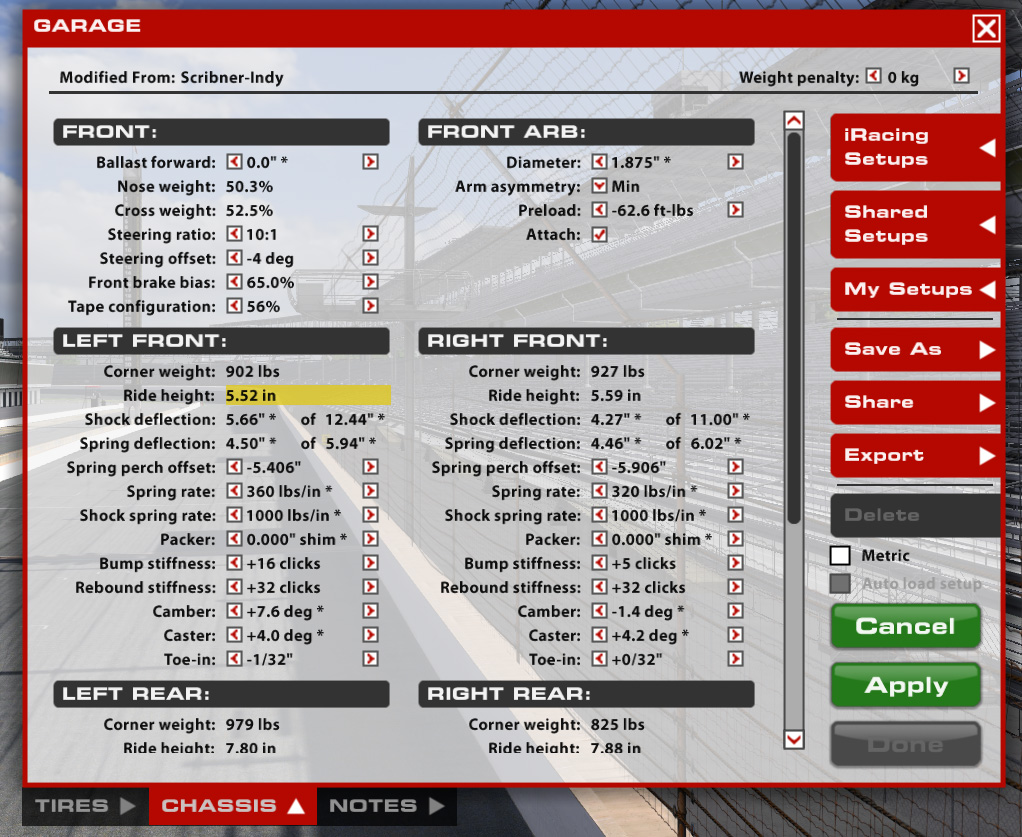
The front end of Alex Scribner’s 2016 Indianapolis Class B setup. Click for larger image!!!
Click that for a larger version. Pretty straightforward isn’t it? Outside of the car having a purely coil-bind front end despite the bump-spring update in early 2016, it’s not out of the ordinary at all, but it was fast. Very fast.
To start with the driver- and setup-specific options, we can go to the Front ARB. Alex used a coil-bind setup, which meant he needed a larger bar than what I was using on my bump-spring cars. He ran this 1.875” bar at Indianapolis, where I ran a 1.625”, for example. What might be a surprise is the lack of bar asymmetry, which we tried to keep as low as possible. The asymmetry adds a vertical spring rate to the front end, known as “heave” rate, which causes the front end to lift quicker out of the corners. At Indianapolis, where the straights are extremely long, this is horrible with the extra drag. Alex also rarely ran a very large amount of preload, typically under 100 ft-lbs, which was around half of what I would use (~220 ft-lbs), but that just came down to personal preference.
The springs are obviously set for coil-binding with all shims removed. The 360 on the left-front allows for a little more travel than the 320, causing the left-front to naturally sit lower on the straights than the right-front. This produces a little bit of extra turn-in due to aero and was something we carried over to my bump-spring cars with a 420/380 front-end spring package. When we got to a track, it was simply a matter of cycling through the front springs until the splitter no longer hit the track. This was done by setting the front end to a rough height with the right-front spring, then running the highest-rate left-front spring we could get away with without dragging the track. Higher rate was more travel, more travel was more downforce. Since Alex was usually running the car with the left-front bound for the entire lap and the right-front bound through the entire corner, the rate values themselves were irrelevant. They were selected for height values alone, not for handling.
Alex had to fight off teammate Rob Ackley, known within GFR as “Iceman” due to his immunity to mistakes to win at Indy. The setup Alex used in this race (pictured) eventually went to every other speedway-sized track and was key to his 2016 Championship.
Rear End Springs

The rear end of Alex’s 2016 Indianapolis Class B car. Click for larger image!!!
Again, we have a fairly ordinary rear end in the car, especially for a coil-binding setup. The 1100 lb/in right-rear spring was typical for Alex’s cars, with a 1300 lb/in appearing in the car at a few tracks. This high rear spring rate had two purposes: First, the high rate was needed to balance the huge sway bar in the front of the car since we don’t have a rear sway bar. Remember from earlier articles that we want the two suspension roll stiffnesses to be relatively close, so since we have a huge front sway bar, we need something to do the same for the rear. The second purpose was purely aero, and intended to keep the car at a tail-up attitude for the whole lap. Softer rate springs at the bigger tracks allowed too much splitter lift and killed the center of the corner. However, if the right-rear spring was set too stiff, the rear deck lid was too high and the car got very tight. Like many things, it was a balance of aero and ride heights, not handling.
The handling spring was the left-rear. The other three springs served specific purposes (mostly aero) so they couldn’t be touched when handling needed some adjustment, leaving the left-rear as the one to shoulder that task. Of all the things on Alex’s cars, the left-rear spring is what I know the least about, but I do know that he always ran a narrower spring split than I did. Here, he has a 300/1100 rear end while my Indianapolis car last year was 200/1200. Regardless of what he ran, this spring was the one adjusted for handling, and the only one adjusted for handling.
Shocks and Alignments
A lot of people ignore the shocks and say they don’t work, which is completely wrong. They work quite well, but not to the extent you’d expect. Shocks were probably the most profound discovery we made during the April test, showing that we could change tire temperatures through the shock settings by themselves without having to mess around with spring perches and alignments. Alex ran high-rebound front shocks to prevent the disaster of an un-bound coil-bind spring and relatively stiff compression rear shocks. My bump-spring cars, on the other hand, ran lower front rebound to allow the springs to work and the rear compression was lower to let the car deal with bumps better. Between our two cars, there was never a race where any of our shocks were set to 32/32 or something simple like that. Every track had unique shocks for each corner.
Alignments, despite looking strange, were pulled straight from real-world data. We ran max camber on the left-front, max rear camber, max rear toe, and set the right-front camber for temperature spread. Front toe was a driver preference, and each driver on our team had what they liked. Alex typically had this zero-toe-out setting while I toed the left-front out 1/16” at smooth tracks and the right-front out 1/16” at bumpy tracks. As with everything: to each his own.
Weight Distribution

The only time I was ever able to use Alex’s coil-bind setup was at Kansas (pictured). The super-low splitter height was achieved through fine-tuning the crossweight.
Where these cars were tuned primarily was through the weight distribution. The harsh nature of coil-binding often required a lower front weight percentage to overcome the front end skipping across the track since there was no working suspension. For those curious, this front end behavior was the reason why I only ever raced Alex’s setup at one track: Kansas. I would destroy the right-front tire at any other track. The ballast was usually left pretty far back in the car since it was, mechanically, very tight.
Crossweight was not only used to tune the car’s handling through the corners, but also the splitter height. At some point during the season, Alex found that changing the crossweight shifted the spring deflection for the front springs which changed when the springs would bind. Shift the crossweight one way and the left-front would bind sooner and the right-front later. Shift it the other way and the opposite happened. This was used to either raise or lower the splitter at speed, allowing the splitter to clear bumps at a track like Kentucky, but keep it very low for a smooth track like Kansas. The biggest jump forward in terms of speed was when he was able to reliably clear the splitter from the track on a week-to-week basis.
Handling
So the majority of the car was set with a specific purpose and couldn’t be changed, so how did he adjust how the car handled? Well, aside from the shocks, this was achieved through track bar height. With everyone’s car, we aimed for equal tire temperatures on both sides of the car (LF=LR, RF=RR), and this was tuned through overall track bar height. Initially, Alex’s cars weren’t very good on shorter runs, but the work to balance the car with the track bar height would pay off in droves if the run went longer than 7-8 laps.
Development, 2017 Use
This car’s final use was the spring Richmond race earlier this year. In 2016, I ran this setup at Richmond in the fall with a softer rear end (850lb/in RR spring), and I carried the exact same setup over to 2017 when we returned. I started 3rd and finished 6th in the big race that week, and the car worked just as well as it did the year before with only the most minor of changes. It was made obsolete in early Summer when the car was updated to disallow coil-binding, shifting every car over to bump-spring front ends.

The last time Alex’s coil-bind setup was ever used was this year at Richmond in my car. Here, I’m running second to teammate Brian Day, who was on a bump-spring setup at the time. The car was updated not long after and the setup became obsolete.
Why would I bring up this setup now? Aside from it being obsolete, the weekly setup process for it went through the steps I outlined in the past few articles: Set the front height, set the rear height, alignment, profit. On average, Alex’s car was set up and ready to go after about 20 minutes on track. We only ever had one session per week for practice which was typically around 2 hours long. If we all weren’t on long runs after 40 minutes there was a massive problem with the cars. We managed to get the time down so efficiently by carrying the exact same setup to each track each week and developing the notebook on how to adjust it. If we went to a smooth track, we knew what to change to lower the car and keep the handling in check. When we went to Kentucky, we knew how to raise it up for the bumps and what to do to keep the car from going full Kangaroo over the bigger jumps. It became simple because we knew what we were working with each and every week. It wasn’t complicated; it wasn’t a guess-and-click type of session. We simply had a plan each week of how to set the car up and worked through each step one at a time. Taking what was learned the week before and applying it the next week eventually developed the setup into a winning car, and that winning car eventually snagged Gale Force Racing its first championship since Nick Ottinger’s 2011 Street Stock championship.
~~~~~~~~~~~~~~~~~~~~
To keep up to date with The Commodore’s Garage, return to Sim Racing News every other Friday afternoon and “Like” our page at https://www.facebook.com/CommodoresGarage

You may also like...


OFFICIAL PARTNERS:


")