

Commodore’s Garage #32 – Myrtle Beach Results
December 27th, 2017 by Matt Holden
The bad news up front: We were never able to get a race in at Myrtle Beach! In hindsight, however, it probably wasn’t the best idea to start all this during the week before Christmas. Still, we did manage to get into a few sessions with regular series drivers and managed to gather quite a bit of info on the setup’s strengths and weaknesses. The setup file will be posted as it was when the week ended on our Facebook page, but as I’ve stressed before: This series is about working through the setup process and I do not expect the setup to work for everybody. Some may like it, some may hate it, but the idea is to give everyone the knowledge and tools to take something and make it work for them!

First Race Run
The first run made in the car in anger was a 20-lapper to gauge the fuel usage per lap and how the car worked the tires in over a lengthy run. Since this was the first run made with other cars (drivers who I know would be competitive), it was essentially a shakedown run because the pace necessary to run in the race was shown to us for the first time. Once the 20 laps were finished, I calculated the fuel usage:
- Finished 20 laps with 16.1 gallons remaining, total burnoff is 2.6 gallons.
- 6 gallons ÷ 20 laps = 0.13 gallons/lap
This fuel burnoff rate would produce about 143 laps on a tank, which is longer than the race itself. It’s possible that this burnoff rate would get better or worse depending on the conditions, and we have to remember that this includes a lap where I left pit road, so a more realistic number is between 135-140 laps. For this race it’s a relatively useless value since the race is shorter than what can be run on a full tank, but it never hurts to have this in the notebook for later.
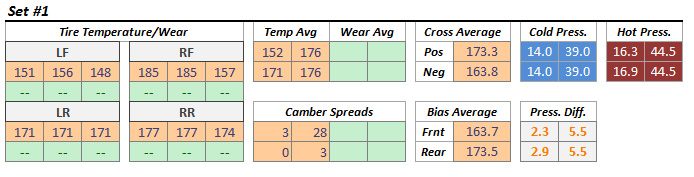
Next, we need to take a look at the tires:

Note that there are no wear numbers because it’s unnecessary at this point: A short track oval with left-hand turns will always show higher wear on the right-front. Period. What we do want to look at here is how the tread is heading up from camber and the pressure buildups because they’ll give us a good idea of which tires were loaded and which ones weren’t. Immediately, we can see that there isn’t enough left-front camber or right-rear camber, both of which would be free speed! The pressure buildups also show a slightly high crossweight for what we were shooting for (equal buildup on each side), but we’ll address that later.
The biggest issue, by far, was a “loose-in” condition. It could be partially attributed to the brake bias (since releasing the brakes would settle the truck down), but it was also brought on prior to braking by simply jumping out of the throttle quickly. This is a sign that it could be shock related as well, so changes to both were made for the second run.
Once everything was looked over, these are the changes made for the second run and descriptions for each:
- LF Camber from +7.2° to +7.9°: The inside of the left-front tire was showing 8° cooler than the middle. If this didn’t cure it, we’d need to drop the pressure in that tire.
- RR Camber from -1.5° to -1.7°: The Middle was slightly warmer on this tire and more rear camber is a no-brainer when you can afford to use it.
- Brake Bias from 62.5% to 64.5%: Fix brake-related oversteer
- LR Rebound from 17 to 15: Reduce the left-rear shock rebound force to add crossweight under braking
NOTE: I intentionally left the crossweight where it was despite finding an issue with it on the tire data. Adjusting the left-rear rebound will have an effect on dynamic crossweight under braking and deceleration, so adjusting crossweight at the same time could have a combined effect with the rebound adjustment. Adjusting the rebound alone would show how much the crossweight changed, or even if it would be enough to show up on the tire data.
Second Run
The second run was shorter, only 6 laps this time, because it was very obvious that the loose-in condition was gone completely. The truck, at this point, was quite stable and would easily be in a position where it could hold its own in a race. Since there was time left in the practice session, we’d simply use it as a test session for IRP in a few weeks. First, a quick look at the tires:
We can see from these tires that the left-front tire could stand to be a little lower on pressure, which isn’t crazy considering how small Myrtle Beach is. Curiously enough, it also looks like the adjustments may have matched up the right-side tires in terms of loading, which is a very good thing. All that’s left is to work on cooling the left-rear off and heating the left-front up.
Final Runs
To check for possible solutions to the left-side tire heating imbalance, I took some time at the end of the practice session to test various ideas to implement next week at IRP. Some changes to the rear spring pairing, specifically a much stiffer right-rear to match our old Xfinity springs, didn’t match well with the line into turn 1 due to having to be on the brakes while steering into a flat corner. It upset the rear-end too much, so I rolled that back. The other rear-end option would be to run a rear sway bar, but I didn’t have the time to reset the right-rear spring to get the same travel rates with a softer coil-spring and a sway bar. Interestingly enough, however, I still have notes from the 2011 Pro Series and 2012 NASCAR DWC season where Nick Ottinger used a rear-sway bar at small, flatter tracks so it would be much easier to hit the ground running with those notes when we go to IRP.
What took up the most time, however, was dropping the crossweight and increasing the nose weight to see how much farther I could take it and if it was possible to iron out the bumps completely. Long story short: Yes. The bumps vanished around 52% crossweight (down from 54.6%), which I had to balance with a bump in nose weight from 50.6% to 51.3%. This produced a much freer truck (as you’d expect) that would roll the center much faster, but produced an interesting effect where the rear was squatting onto the right-rear corner on exit and basically “wobbling” its way off the corners. It got rid of the bumps, but dealing with the wobble was a whole new issue in itself.
IRP Preparations
So, despite not actually being able to race, we did get quite a lot of useful information from the longer runs made while building the setup and in practice. The two initial runs in practice showed that the setup would respond to adjustments extremely well, but adjusting by a large amount could produce some unforeseen problems like the “wobble”. As for speed, the setup was decent, but was around 3-4 tenths off of the drivers I know would be front-runners so there’s room to work. This speed could likely be found in simple aerodynamic tweaks, since the large bumps were causing the splitter to hit the track a few times, and the rear was higher than I’d like to have had it with the softer rear springs. Running around the faster cars showed that my setup was running well under braking and on throttle, but was lacking in the center of the corners.
We have no plans to run Talladega since it would be a one-off event for the season, so the next track (Indianapolis) will see this setup return. While I’ve never raced anything at Myrtle Beach, I have run modifieds and late models at Indianapolis so I actually have an idea of where to go before rolling into town. I would definitely like to run the crossweight down where I had it at the end of practice, but I must figure out how to remove the right-rear squat on corner exit. This will likely come in the form of a stiffer right-rear spring and a higher-compression shock. To prevent the truck from becoming overly-loose in the higher-speed corners, I’ll need a stiffer left-rear spring to go with it, so I will fall back on the 325/1200 combination I used in the Xfinity series for short tracks in 2016. Other than that, the front-end will likely stay the same, but I do plan to test a more aggressive left-front configuration with a high-rate coil-bind spring (probably 400 or so) in an effort to get the splitter down.
~~~~~~~~~~~~~~~~~~~~
To keep up to date with The Commodore’s Garage, return to Sim Racing News every other Friday afternoon and “Like” our page at https://www.facebook.com/CommodoresGarage

You may also like...


OFFICIAL PARTNERS:


")